Dry goods | Programming Xiaobai simulates a simple bitcoin system, with you writing a wave
Source of this article: Blockchain Base Camp
Author: VV smileヽ
If there is a p2p demo, how can we apply it to the blockchain?
Come try it today!
- Every time PlusToken changes, the crypto market is stormy?
- How to "shock reduction" The risk control method of the head digital currency institution
- Bitcoin continues to fall, halved or unable to return to the sky?
First, we need to simulate multiple nodes in the network to communicate with each other. We assume that the current situation is that there are two nodes of AB. The whole process is shown in the following figure:


Carding process
Let's sort out the entire process and clarify what needs to be done in a p2p network.
- Start node A. A first creates a genesis block
- Create wallet A1. Call the API provided by node A to create a wallet. At this time, the ball coin of A1 is 0.
- A1 mining. Call the mining API provided by node A to generate a new block, and at the same time, have the system reward ball coins for A1's wallet.
- Start Node B. Node B needs to synchronize information with A, the current blockchain, the current transaction pool, and the current public keys of all wallets.
- Create wallets B1 and A2, and call the APIs of nodes A and B to broadcast (notify each node) the created wallet (public key) . Currently, there are only two nodes, so A needs to tell B and A2's wallet. B needs to tell A, B1's wallet.
- A1 transfers to B1. Call the API provided by A while broadcasting the transaction .
- A2 mining and accounting. Call the API provided by A while broadcasting the newly generated block .
To sum up, the node just started to join the blockchain network and needs to synchronize other nodes'
- Blockchain information
- Wallet information
- Trading Information
A node already in the network needs to notify other nodes in the network in the following cases
- New transaction occurs
- Create new wallet
- Mining generates new blocks
The general process of P2P is the following points, and our implementation will combine this process.
- client → server sends a message, usually requesting data
- After receiving the message, the server sends a message to the client (calling service and returning data after processing)
- The client receives the message to process the data (calling the service to process the data)

Related code
In the implementation process, because there are many message types, a message object is encapsulated to transmit the message, the message type is encoded, unified processing, the message object Message, and the Serializable interface is implemented to make its objects serializable:
public class Message implements Serializable { /** * 消息内容,就是我们的区块链、交易池等所需要的信息,使用JSON.toString转化到的json字符串*/ private String data; /** * 消息类型*/ private int type; } The types of messages involved are:
/** * 查询最新的区块*/ private final static int QUERY_LATEST_BLOCK = 0; /** * 查询整个区块链*/ private final static int QUERY_BLOCK_CHAIN = 1; /** * 查询交易集合*/ private final static int QUERY_TRANSACTION = 2; /** * 查询已打包的交易集合*/ private final static int QUERY_PACKED_TRANSACTION = 3; /** * 查询钱包集合*/ private final static int QUERY_WALLET = 4; /** * 返回区块集合*/ private final static int RESPONSE_BLOCK_CHAIN = 5; /** * 返回交易集合*/ private final static int RESPONSE_TRANSACTION = 6; /** * 返回已打包交易集合*/ private final static int RESPONSE_PACKED_TRANSACTION = 7; /** * 返回钱包集合*/ private final static int RESPONSE_WALLET = 8;
Because there are too many codes, not all of them are stuck here. Take the client to synchronize the wallet information of other nodes as an example. Combine the three steps of p2p network interaction above to introduce the related implementation.
1. client → server sends a message, usually requesting data
In the startup class of the client node, first create a client object, call the client internal method, and connect to the server.
Start the key code in the main method of the class, (the port parameter is configured in args):
P2PClient p2PClient = new P2PClient(); String url = "ws://localhost:"+args[0]+"/test"; p2PClient.connectToPeer(url);
ConnectToPeer method in P2PClient
public void connectToPeer(String url) throws IOException, DeploymentException { WebSocketContainer container = ContainerProvider.getWebSocketContainer(); URI uri = URI.create(url); this.session = container.connectToServer(P2PClient.class, uri); }
In P2PClient, WebSocketContainer.connectToServer will call back the onOpen function. Assuming we only query the wallet public key information, the server will receive the corresponding request at this time.
@OnOpen public void onOpen(Session session) { this.session = session; p2PService.sendMsg(session, p2PService.queryWalletMsg()); }
Note: I encapsulate the operations related to parsing messages into a service, which is convenient for the unified use of server and client. Given the corresponding queryWalletMsg method:
public String queryWalletMsg() { return JSON.toJSONString(new Message(QUERY_WALLET)); }
And the sendMsg method mentioned earlier:
@Override public void sendMsg(Session session, String msg) { session.getAsyncRemote().sendText(msg); }
2. After receiving the message, the server sends a message to the client (calling service and returning data after processing)
The server receives the message and enters the OnMessage method in the P2PServer
/** * 收到客户端发来消息* @param msg 消息对象*/ @OnMessage public void onMessage(Session session, String msg) { p2PService.handleMessage(session, msg); }
p2PService.handleMessage is to parse the received message (msg), and call other methods according to the type (a giant switch statement, a small part is introduced here). Here we received the information code QUERY_WALLET from the client.
@Override public void handleMessage(Session session, String msg) { Message message = JSON.parseObject(msg, Message.class); switch (message.getType()){ case QUERY_WALLET: sendMsg(session, responseWallets()); break; case RESPONSE_WALLET: handleWalletResponse(message.getData()); break; ...... }
According to the information code is QUERY_WALLET, call the responseWallets () method to get the data.
private String responseWallets() { String wallets = blockService.findAllWallets(); return JSON.toJSONString(new Message(RESPONSE_WALLET, wallets)); }
Here I also encapsulate the related operations of the blockchain into a service. The specific implementation of findAllWallets is given below. In fact, it is to traverse the wallet collection and count the wallet public keys without any difficulty.
@Override public String findAllWallets() { List wallets = new ArrayList<>(); myWalletMap.forEach((address, wallet) ->{ wallets.add(Wallet.builder().publicKey(wallet.getPublicKey()).build()); }); otherWalletMap.forEach((address, wallet) ->{ wallets.add(wallet); }); return JSON.toJSONString(wallets); }
After getting the data, return it to the client:
Therefore, in our responseWallets () method, the last sentence creates a new Message object, sets the message code to RESPONSE_WALLET, and calls the sendmsg method in handleMessage to pass it back to the client.
case QUERY_WALLET: sendMsg(session, responseWallets()); break;
3. The client receives the message to process the data (calling service to process the data)
The client receives the requested data and enters the OnMessage method in the P2PClient
@OnMessage public void onMessage(String msg) { p2PService.handleMessage(this.session, msg); }
Also enter the p2PService.handleMessage method we mentioned above, the message code received at this time is RESPONSE_WALLET, enter the handleWalletResponse method
case RESPONSE_WALLET: handleWalletResponse(message.getData()); break;
The implementation of handleWalletResponse parses the received wallet public key information and stores it in the blockService of the client node.
private void handleWalletResponse(String msg) { List wallets = "\"[]\"".equals(msg)?new ArrayList<>():JSON.parseArray(msg, Wallet.class); wallets.forEach(wallet -> { blockService.addOtherWallet(walletService.getWalletAddress(wallet.getPublicKey()),wallet ); }); }
In the specific implementation, because the way of injecting services is used, when using the @Autowired annotation to the server (@ServerEndpoint) and client (@ClientEndpoint) to inject beans, due to the characteristics of the Spring boot singleton, the websocket is created every time A new object, so a null pointer exception will occur when using the service. Therefore, we have created a utility class Springtil, and each time we need a service, we get the beans we need from the Spring container. Tool class code.
public class SpringUtil implements ApplicationContextAware { public static ApplicationContext applicationContext; @Override public void setApplicationContext(ApplicationContext applicationContext) throws BeansException { if (SpringUtil.applicationContext != null) { SpringUtil.applicationContext = applicationContext; } } /** * 获取applicationContext */ public static ApplicationContext getApplicationContext() { return applicationContext; }
/ ** * Get Bean by name. * / Public static Object getBean (String name) {return getApplicationContext (). GetBean (name);} / ** * Get Bean by class. * / Public static T getBean (Class clazz) {return getApplicationContext (). getBean (clazz);}
/ ** * Returns the specified bean by name and Clazz * / public static T getBean (String name, Class clazz) {return getApplicationContext (). GetBean (name, clazz);}} Therefore, before testing, we first need to set the applicationContext in SpringUtil. The startup class is given below (for simple testing, two nodes share a startup class and are processed separately according to args) and the configuration of the relevant nodes.
public static void main(String[] args) { System.out.println("Hello world"); SpringUtil.applicationContext = SpringApplication.run(Hello.class, args); if (args.length>0){ P2PClient p2PClient = new P2PClient(); String url = "ws://localhost:"+args[0]+"/test"; try { p2PClient.connectToPeer(url); } catch (Exception e) { e.printStackTrace(); } }
When using, we need to get the bean manually
//之前是这样//@Autowired//private P2PService p2PService;//改正后,去掉Autowired,每次使用都手动获取beanprivate P2PService p2PService;@OnOpenpublic void onOpen(Session session) {//如果不使用那些,在这里会报空指针异常,p2PService 为null p2PService = SpringUtil.getBean(P2PService.class);//新增这句话从IVO容器中获取bean p2PService.sendMsg(session, p2PService.queryWalletMsg());}
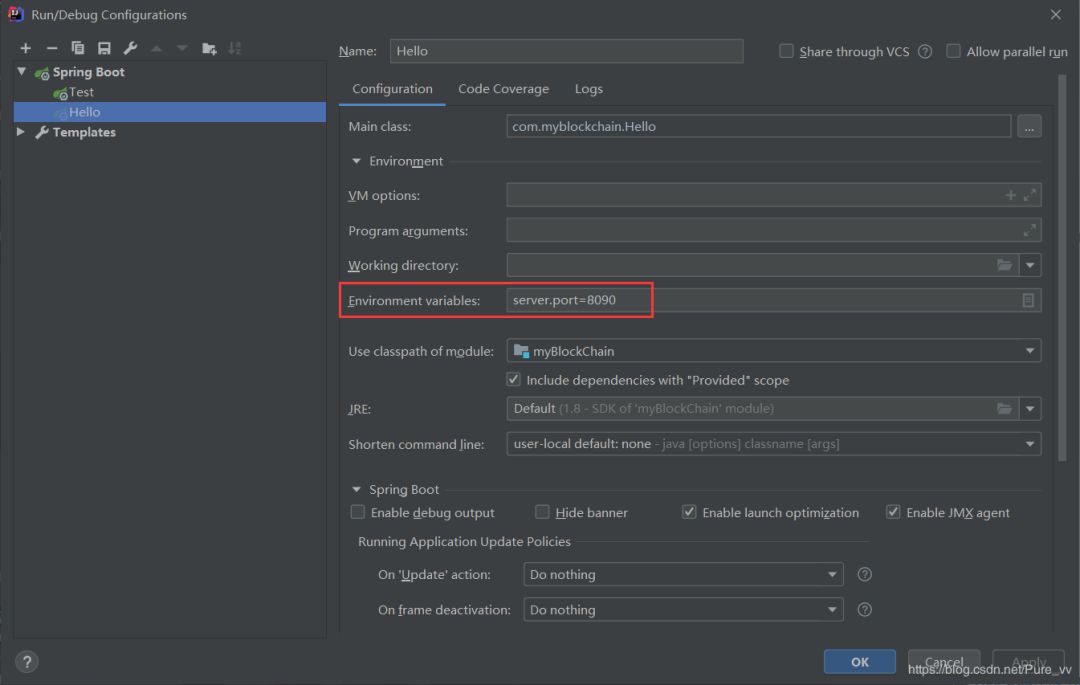
Hello node, as server when testing
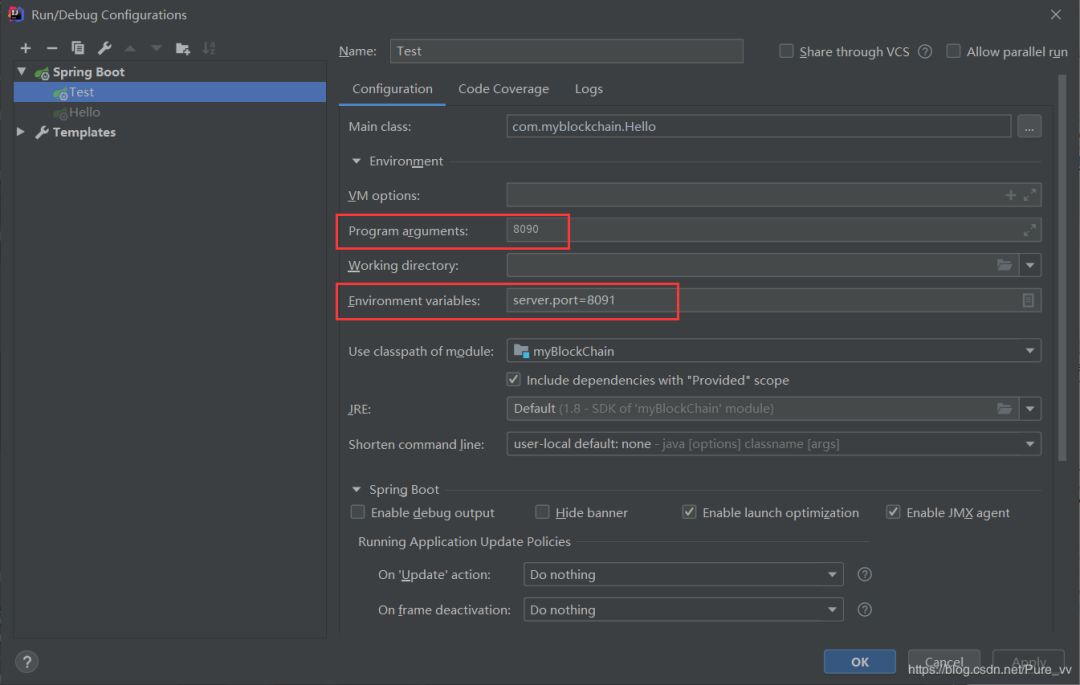
The Test node acts as a client when testing.
At this point, we have realized the interaction between the server node and the client node in the p2p network. I suggest you also try it out and discuss with us in the comment area!
We will continue to update Blocking; if you have any questions or suggestions, please contact us!
Was this article helpful?
93 out of 132 found this helpful
Related articles
- With credit, there is tomorrow! 5 ways that blockchain + supply chain finance can help companies finance
- Babbitt Column | Interpreting Celo's "Prosperity Alliance": Is Libra's Competitor Coming?
- In the case of BTC price decline, long-term and short-term holders have not left?
- Observation | Exploration of Blockchain + Medical Supplies to Create a New Industrial Ecology
- Research | Blockchain Quantitative Product Selection Strategy
- Economic bandwidth without trust: why Ethereum is irreplaceable
- Vitalik: Ethereum state explosion problem, polynomial promise solution can solve