How To | Build a Zero-Dependent Application on IPFS (Vol. 2)
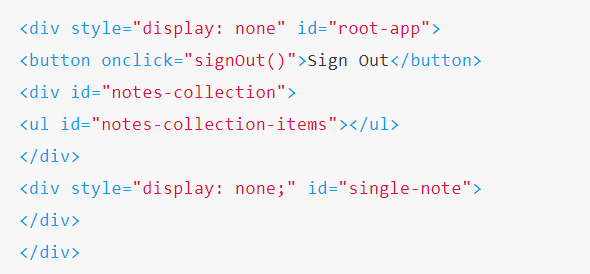
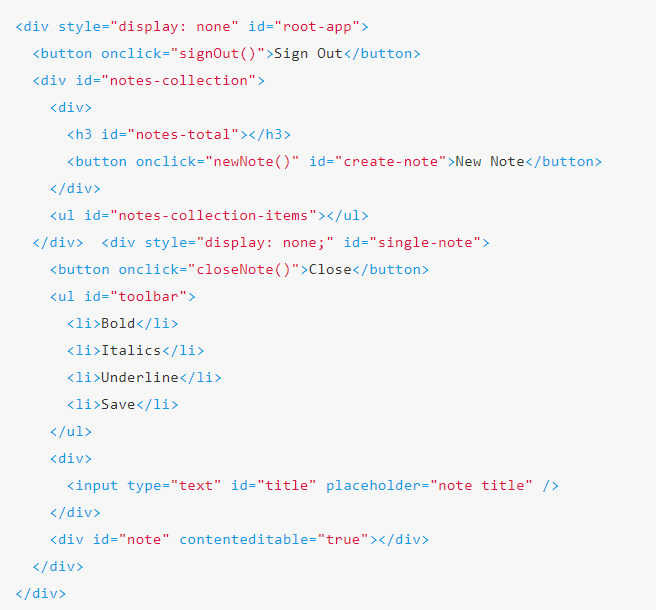
This article is collected and translated by the IPFS Force Zone, the original author of the copyright.Note:This articleconsists of two parts.The first part focuses on authentication and the secondpartfocuses on publishing and getting content from IPFS. In the previous volume of this tutorial, we set up authentication for the application. We don't need dependencies to do this, there are only two files – index.html and main.js. In this volume, we will build this application, which is a simple note-taking application that stores content on IPFS. We use the SimpleID API, and IPFS storage is implemented through the services provided by Pinata. Start here with html. We already have a section to save the application content. Find the section shown below: The logout button can be retained, but we need to delete the This is the app text and replace it with the actual application content. I need to consider the following things:
How do I switch between taking notes and viewing all existing notes?
How to present all existing notes?
Let's set up our html content to support the correct answer to these questions:
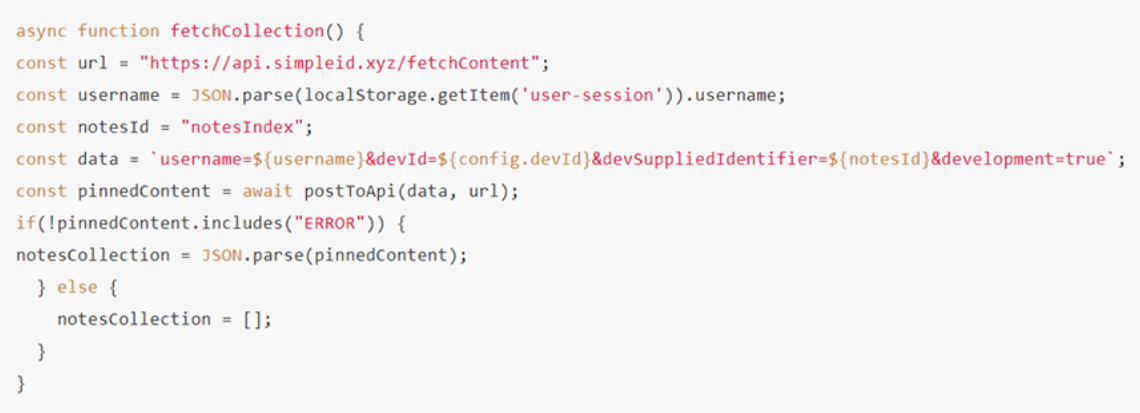
When displaying application content, we don't want to display notes and notebooks at the same time. We think that the user's notebook is more clear, and then press the button or something else to present the notes. So, let's start with notes-collection rendering and single-note hiding. You can notice that in the notebook, you already have an ul without any child element li. That's because we're going to programmatically render these list items as we load the noteset. Now that we have the framework for the application content, let's jump to the JavaScript file and get the notes-collection index file. This file will contain an identifier, title and date array for all our notes. In main.js, we first need to add a new global variable at the top of the file. Add the line notesCollection = []; below the loading variable. Now add a new function called fetchCollection():
If you remember, we created a reusable function to publish to the SimpleID API, which always returns a promise.
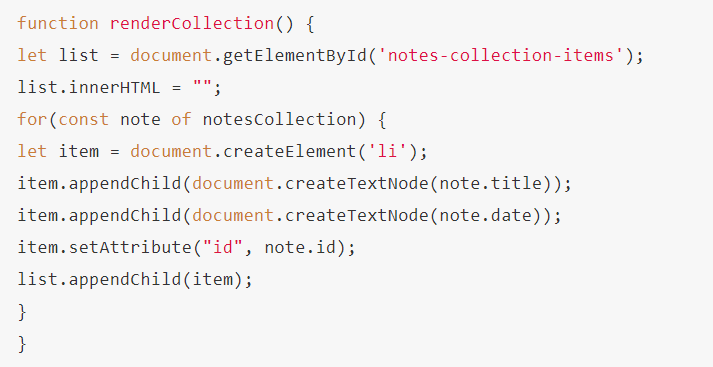
Here we just specify the url to be published and the data to include. The data we send must contain an identifier to find the correct file from the IPFS network. That is the notesId. You might ask how to use this identifier for multiple users while returning the right content for each user. This is the source of the username variable. In our published data, the username should be the username of the user you are logged in to. Remember that it is stored in localStorage and we can easily get and include it. When we make a request to the API, we need to consider any errors that may arise, including insufficient storage previously. Therefore, we need to check for errors, and if not, use the response to set the notesCollection array. Otherwise, we set the notescollection to an empty array. But this is not enough. We need to pass the array in turn and add a list item for each note between notes-collection-itemsul. We can do this to check if an error is generated. So, if the block adds this under notescollection=json.parse(pinnedcontent), let's add a call to the rendercollection() function. Then we can create the renderCollection function as follows:
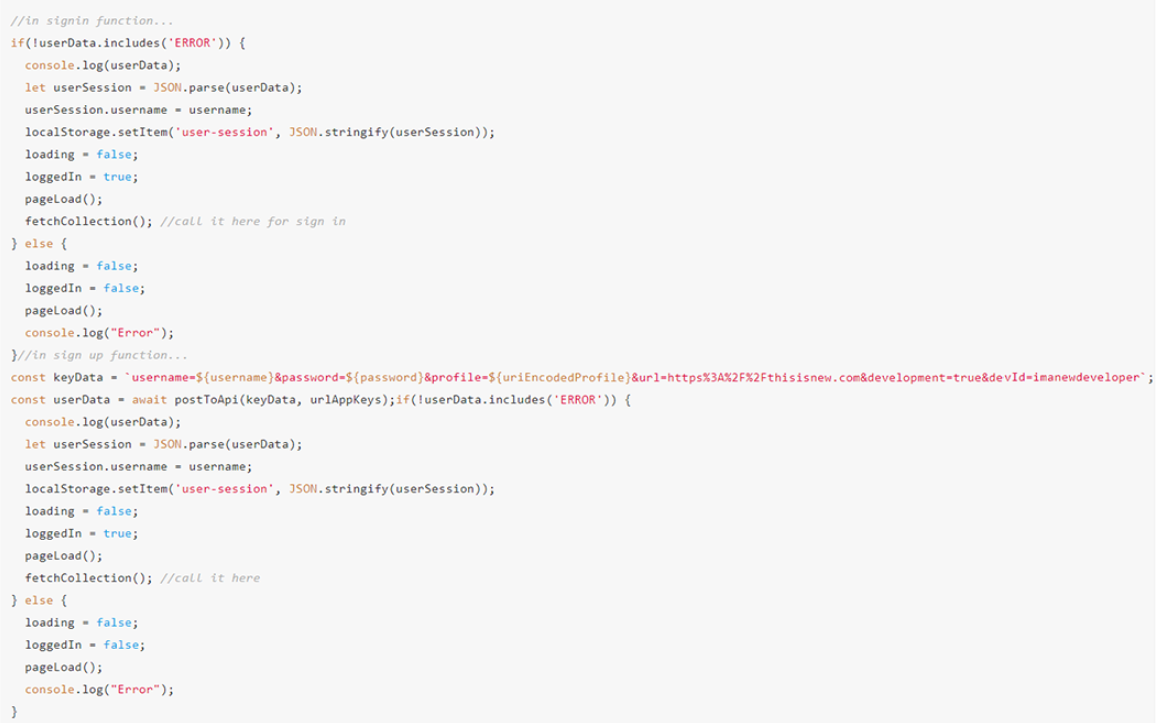
Here we just grab the ul we created, create a sublist item below it, and populate those list items with the comment title and the comment date. We also set the id of the annotation to the element id. These will come in handy when we want to display the actual content of the notes. This needs to be called after the user logs in and registers, so let's connect them:
We also need to call the fetchcollection every time the page loads because the user might refresh the screen. We should only do this when the user logs in. So, add the following to the pageload() call at the top of main.js:
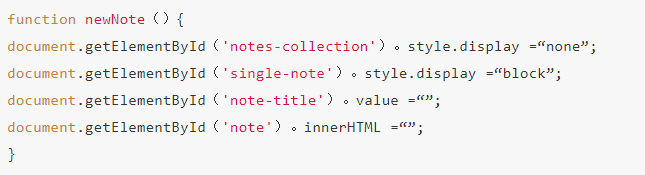
Now that we know what else is not showing, let's consider how to create a new note. I mentioned before creating a button, I like this idea a bit. Let's add some content to the app content:
We added a button, let's create a new note, and then we bind an event handler to call it newNote(). We added a button to close the open note screen. It calls a function to close the note screen. We also added a toolbar to the single note section. This will be a simple note app with simple features – bold, italic, underlined. There is also a save button in our toolbar, which we will connect later. We need to give the note a title, so we also added a title input field. Finally, we added a contentteditable div to hold the annotation and give it an id for later reference. Next, I think we should let the New Note button display our new notes, which we do in the main.js file. Open it and add a function called newNote(): We hide the notebook in the newNote() function because we don't need to see it when writing new notes. Then we will display the note screen. We also set the note title and note content to an empty string, because each time you press New Note, it should be a new note filled with content.
Here, we can also set the closenote() function:
We are hiding the note-taking screen and displaying the note set screen again. It should be noted that the note will only be saved when the user clicks Save note. We haven't set it up yet, but it will be implemented. This means that when the user clicks the close button, nothing is saved. You are welcome to set it up in different ways.
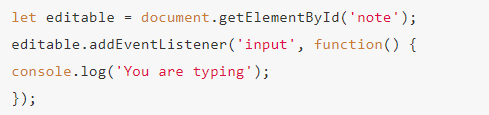
The next two things to do are to handle the content changes in the note-taking section (when the user logs, we want to track those changes) and handle the toolbar buttons. Let's start by tracking content changes. To do this, we will add an event listener to our main.js file. You can do this on the first function, but do this under the pageLoad() call as follows:
Save and then continue to create a new note and enter your content when you log in to your app. Open the Developer Console and you should see what you typed. We need to track the actual content so that we have a variable available to use when saving. To do this, let's create a new global variable at the top of the main.js file below the notescollection variable: Let noteContent = "";
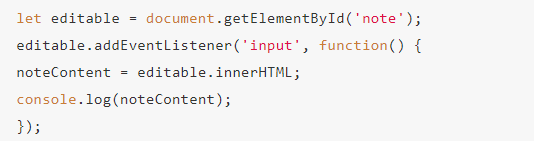
Now, in the event listener, we can remove the console.log and replace it with the innerHTML of the contentEditable div and set it equal to the noteContent variable. As follows:
I added a console.log below to make sure everything is ok. If you want, you can do this and test by creating a new comment, typing it, and then opening the developer console. You should then see the html representation of what you typed in the console. Now let's format this text. For our toolbar, we need to add an onclick event handler for each item. When you click each toolbar button, it should apply to the format specified by the app. Fortunately, there is some built-in JavaScript that supports this. Let us give it a try:
We built a very simple WYSIWYG editor for our note-taking application using JavaScript's built-in execCommand feature in JavaScript. Cool, right? You will notice the onmousedown event handler. This is because when you click the toolbar button, the focus will be removed from the text that needs to be formatted, making the button look inoperable. We use this event handler to prevent this. Now we need to connect the Save Note button. Let us consider what we need to do:
Create an object to hold the note title, note content, and note id (which can be easily generated)
Add a new comment to an existing notesCollection array
Save an index file containing all the notesCollection arrays
Save the note file itself with the full content
Let's add an event handler to the Save Note button in the toolbar:
Ok, now let's create this function in the main.js file:
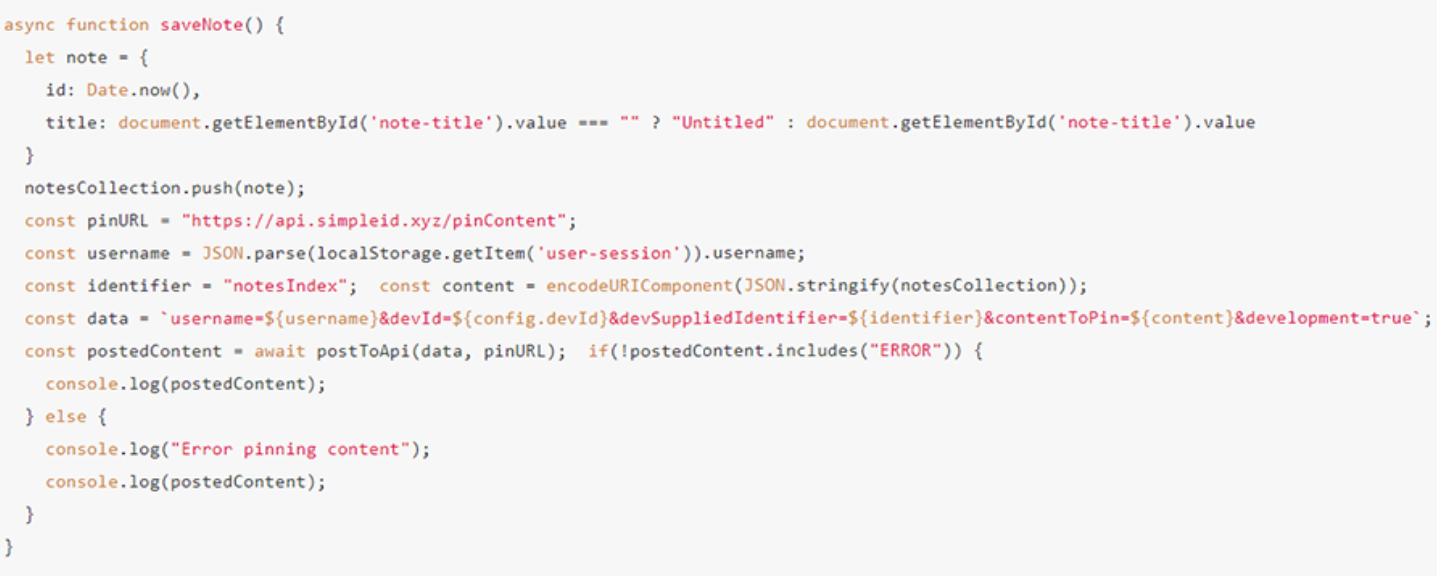
We are taking steps to ensure that the work goes smoothly, but please continue testing. Recreate the note, write something, give it a title, and save it. In the console, you should see a separate comment and you should see the notescollection array updated. You will notice that the note object does not contain content. This is because the first thing we have to do is update the index of the notes, which only requires basic metadata. The next thing we have to do is save the index file to IPFS. That's right, you should always wait for this. We save some content! To test this, let's update the savenote() function: Here, we specify the API endpoint, get the username of the logged in user, URIE encode the content, and then build a data string that is compatible with the data. These are all sent to the posttoapi() function. We check the response of the API call and look for the error. If there are no errors, we are ready to move on. If so, our console will record it. Now, we only do half of it. We also need to save a single note and its contents. Let's set it up. Inside the if(!postedContent.indludes("ERROR") block, let's add:
Basically, what we did was exactly the same as when we saved the note collection index file, but we did it for a single note. See how we add the noteContent variable to the note object? This is because for a single note, we also want to load the full note, including the content.
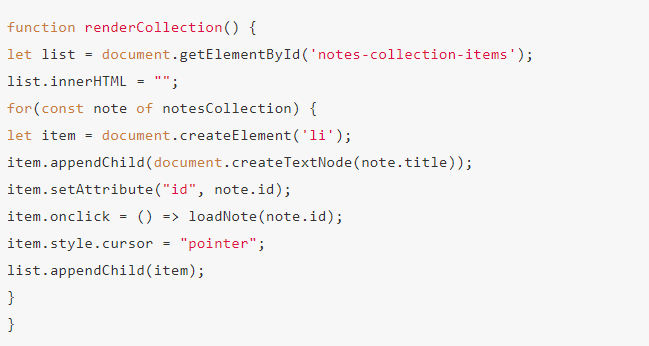
If all goes well, we will close the note and display the set of notes, but we will also call the rendercollection to ensure that the ui is updated with new notes. Now that we have some updates to the renderCollection function, we can do this:
We added a style attribute to the note list item so that when we hover over it, the mouse cursor turns into a pointer, just like hovering over the link. We also added an event listener that calls the loadnote function when clicked. This is very intuitive, but we want to be able to click on the title of a note and load the entire contents of the clicked note.
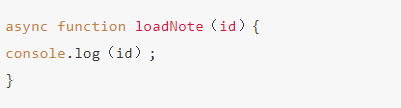
Now let's remove the loadNote function:
Let's continue testing. If you save and refresh your browser, you should see (if any notes have been saved) and the list of saved notes will be displayed as an unordered list. Click on the title of one of the notes and check the developer console. You should see the ID that shows this note.
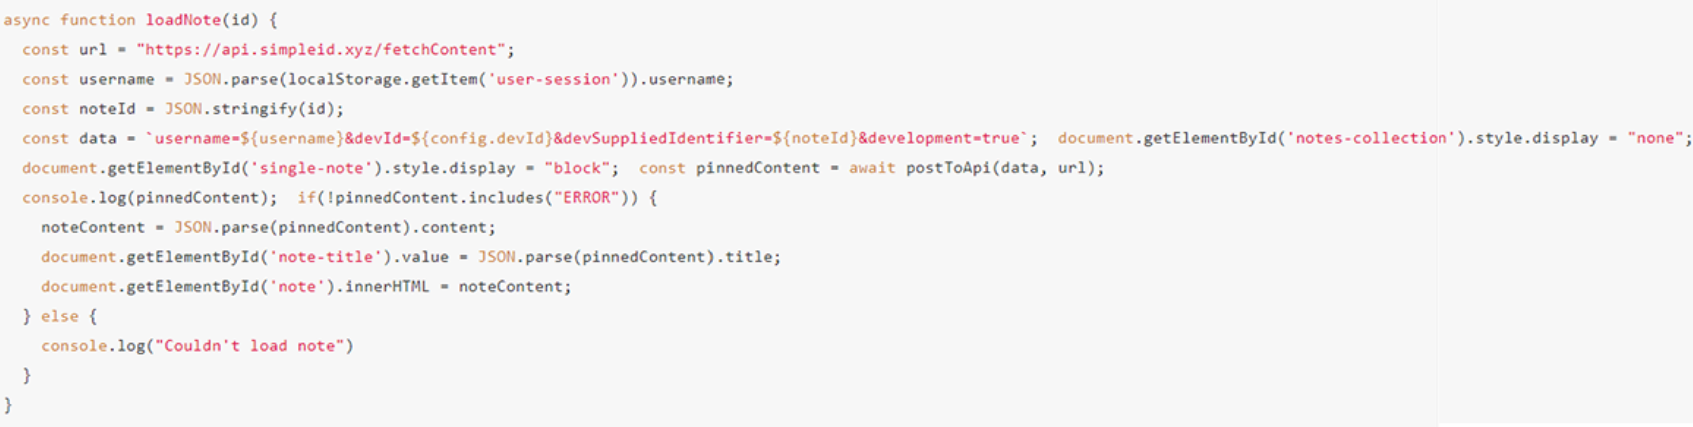
We are almost done. All we need to do now is load the notes with the actual content so that the user can view or edit them as needed. Let's do this in the loadNote() function:
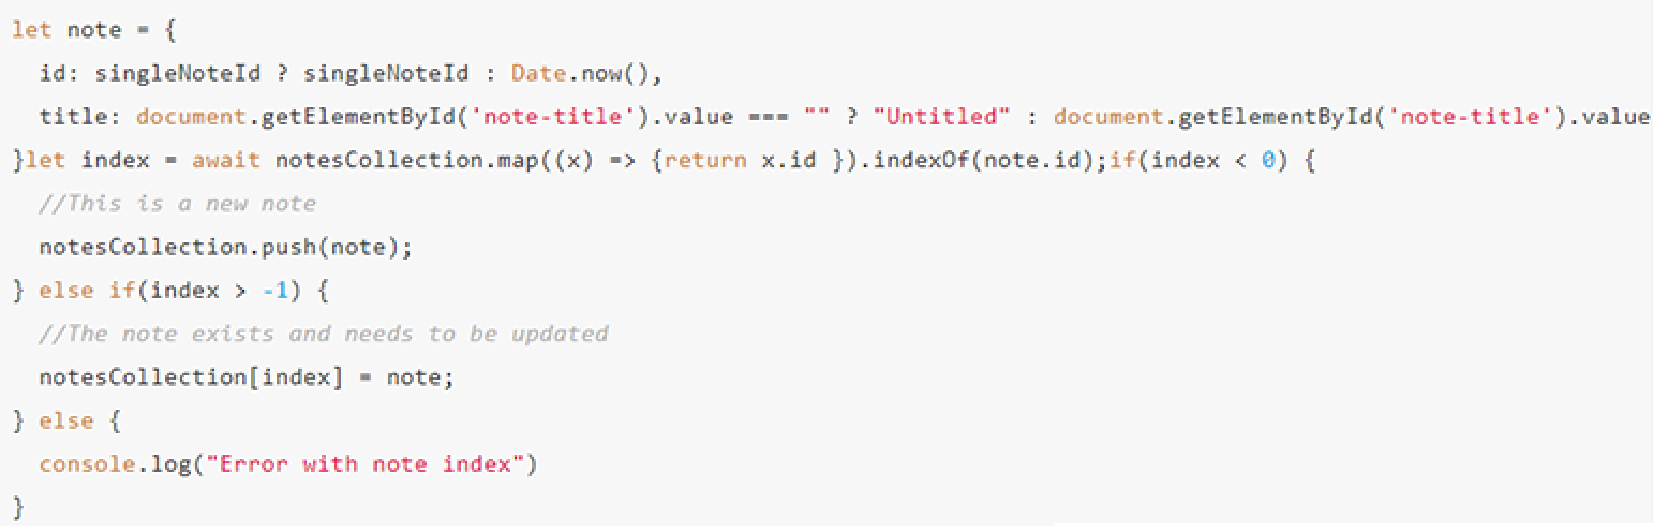
Test it now. Create a note, save it, open it. Everything seems to be working, but we forgot one thing. If we want to edit an existing note, it won't update the note, but instead create a new note. Let's solve this problem. First, we need to make sure that the single note id is set to a global variable so that it can be used again when trying to save an updated note. So, at the top of the main.js file, add the following global variable noteContent = "": Let singleNoteId = null; Then, in your loadNote function, add at the beginning: singleNoteId = id; Now go to the saveNote() function and update the top of the function with the following code:
Now we should be able to create new notes and update existing ones. Let us confirm. Open an existing note, edit it, and click the "Save" button. you did it! You have just built a zero dependency application and you can do the following:
registered
log in
Logout
New note
Format description
Save to IPFS
Obtained from IPFS
Except that this is a zero-dependent application, the entire application is still very small, unbundled and uncompressed and decompressed to less than 20kb. The whole application is very ugly, and the CSS I provided has no way to make it better, but you can grab this CSS and make it at least look decent. It's worth pointing out in this tutorial that you are using an API key client. This is not safe. If you are concerned about other people seeing and using your API key, you should cover this up by setting up the server, calling the server, and using the SimpleIDAPI function on that server. You can protect the key on the server side.
—end—
This article is compiled by the IPFS Force Zone, the original link: Https://medium.com/simpleid-dev-tools/tutorial-build-an-encrypted-notes-app-on-ipfs-part-ii-3bdba2d867ad [IPFS Force Zone] Headquartered in Shanghai, it gathers a large number of technology-based coffee shops and enthusiasts based on distributed network & storage, and deeply cultivates IPFS-based commercial ecological construction and community development.
We will continue to update Blocking; if you have any questions or suggestions, please contact us!