Talking about Zero-Knowledge Proof: Short Non-Interaction Proof (SNARK)
The author of this article, Dong Ze, a small partner from the Abe technology community, is currently studying at Stanford University and researching cryptography. This series of articles is derived from the author's study notes on Stanford's famous course "CS 251: Cryptocurrencies and blockchain technologies". The course teacher is Dan Boneh of Cryptography.
After the publication of the last issue, I was very surprised that so many small friends finished reading and expressed likes. So let's continue this issue! This time, let's talk about SNARK.
I believe that friends who have read the previous article will have a little puzzlement: why can we create a certificate so short and prove a long message? I also had this same doubt before class, and even thought it was a "black technology", but I believe that after reading this article, you will know how to control this "black technology".
Before discussing it in detail, we have to be a little serious and systematically study the basic structure of SNARK.
- Advantages become disadvantages, researchers say Lightning Network is the best choice for creating botnets
- China Baowu's first single-chain ABS "Tongbao No. 1" was successfully established and will be listed on the Shanghai Stock Exchange.
- Past: Pioneer Reveals How Bitmain S9 Becomes "One Generation King"
Four-step construction of SNARK
Because of the "black technology" feature of SNARK, if you want to build a short proof system, the process is slightly complicated. To sum up, it can be divided into four steps, which we will describe step by step in detail.
Step 1: Determine the finite field
Before constructing, we need to determine a Finite Field that can contain the size of all the numbers we want to calculate. In plain words, we need to choose a very large number p to ensure that this number is larger than all the numbers in the problem we are solving .
If you have known friends who are similar to RSA cryptography before, you may be familiar with this concept. The finite field is to add a ceiling to all our numbers and determine the calculation space of the entire mathematical system. Similar to the computer, if we want to create a variable that stores numbers, we need to think about whether we need a uint32_t (32 bits), A uint64_t (64-bit) is the same. All values that exceed the finite field will directly overflow and then go back to 0.
In the mathematical world, there are actually many types of computing spaces that meet this characteristic. The most common one is the positive integer used in the RSA algorithm to find a large prime (integer mod p). Finding a number p mentioned above is actually a large prime number, and then we can use it to generate a calculation space.
After determining the computing space, we can really start building SNARK.
Step 2: Constructing Arithmetic Circuit
When we find a digital space, the next thing we need to do is to represent the problem we want to prove and solve with a mathematical operation circuit .
What is a mathematical operation circuit? Let's take a look at traditional logic circuits first.
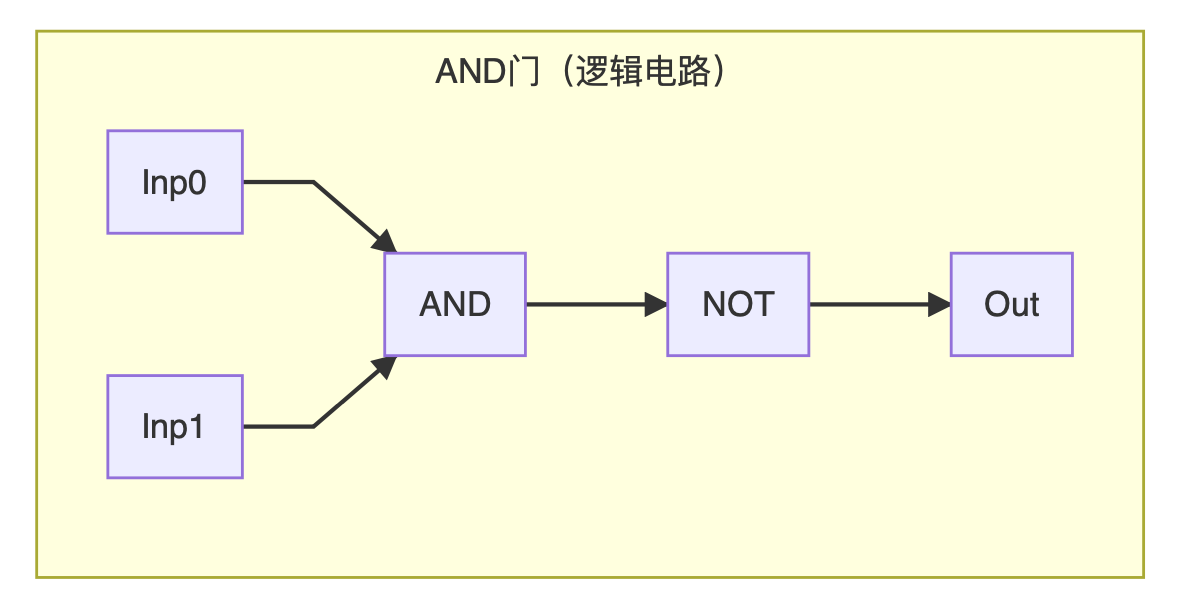
The above diagram illustrates a NAND circuit. Without first understanding the usefulness of the circuit, we can find that the two sets of input signals pass through the two basic logic gates, AND and OR, respectively. Basic logic gates like AND and OR are the basic modules of logic circuits. By adding and stacking, we can implement any complex logic.
The mathematical operation circuit is the same, except that the basic module is changed from a logic gate to a mathematical operation. Because addition and multiplication are the most basic mathematical operations, we can also implement almost all other arithmetic methods through addition and multiplication, so we can choose "addition gate" and "multiplication gate" as the basic modules of our mathematical operation circuit . By superimposing arithmetic gates, we can build a "circuit" of a complex polynomial.
In order to better understand the operation gate, let's try to convert the above NAND gate from a logic circuit to a mathematical operation circuit . (Assuming that Inp0 and Inp1 are the same as the original logic circuit, they still input 1/0 logic signals.)
Let's look at the AND gate first: AND is actually very simple, because the result of AND will be 1 only when Inp0 and Inp1 are both 1. We quickly discovered that a multiplication gate can perfectly replace the AND gate: only when the two inputs are 1, the result of the multiplication will be 1.
After solving the AND, let's convert NOT: NOT is actually very simple, because the input signal can only be 0 or 1, as long as the input signal is subtracted from 1, the result is the opposite. Note that there is a problem, because we only have addition and multiplication, so if we need to implement subtraction, we need to first multiply the input signal by a constant -1.
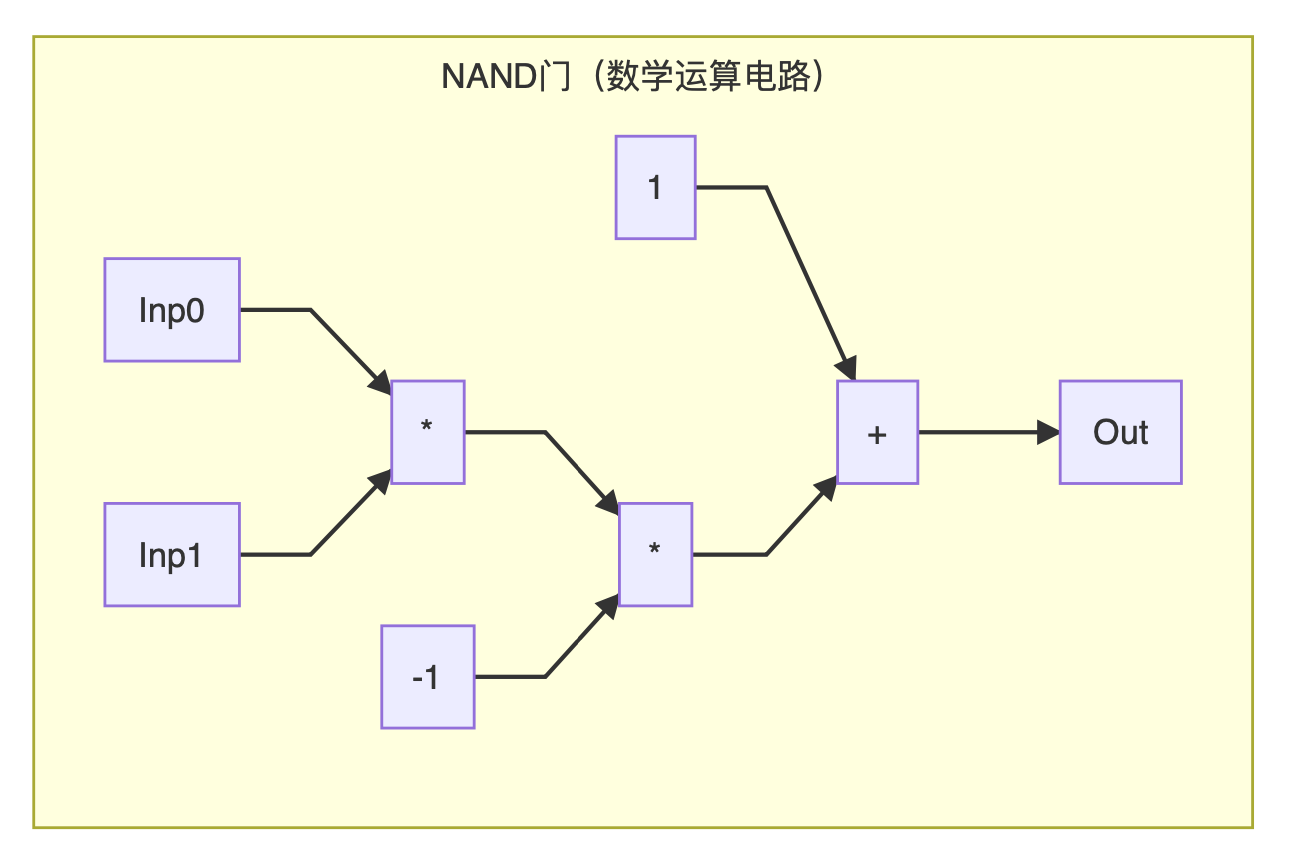
After this conversion, we successfully converted a logic circuit into a digital logic circuit. At the same time, because we already know how to build AND and NOT, in theory we can modularize these two parts and splice arbitrary complex logic.
Seeing here, you may think that the arithmetic circuit is very simple, and the conversion to the logic circuit is also very straightforward. But in fact this is because we have been assuming that the input of the arithmetic circuit is the same as the logic circuit, either 0 or 1. In a real scenario, the input value of an operation gate may be very large (depending on the size of our finite field selection). Therefore, we must find a way to constrain the input of our arithmetic circuit so that it is not only functionally the same as the logic circuit, but also only two numbers [0, 1] in the input value.
But how to use arithmetic gates to represent such a relationship? Because the mathematical operation circuit is actually a complex polynomial (for example, the NAND circuit in the figure above becomes Out = 1-Inp0 * Inp1), we can convert this question: can we create a polynomial only when one input satisfies When the value range of [0,1] is 0, 0 will be output? In the end, we found that there is such a polynomial that can meet this requirement:

The meaning of the above series of expressions is that only when the number n is in this range, the following polynomial n * (n-1) will output 0. In other words, we can connect the Inp0 and Inp1 mentioned above to the arithmetic circuit converted by this polynomial. As long as the output of this arithmetic circuit is 0, then we can be sure of the output of the NAND arithmetic circuit above. That's right.
Some people may ask that the polynomial that restricts the value can only limit one input, but we have two inputs, how to limit their range of values at the same time? In fact, the answer is very simple, just copy the same polynomial, and the two are just fine.
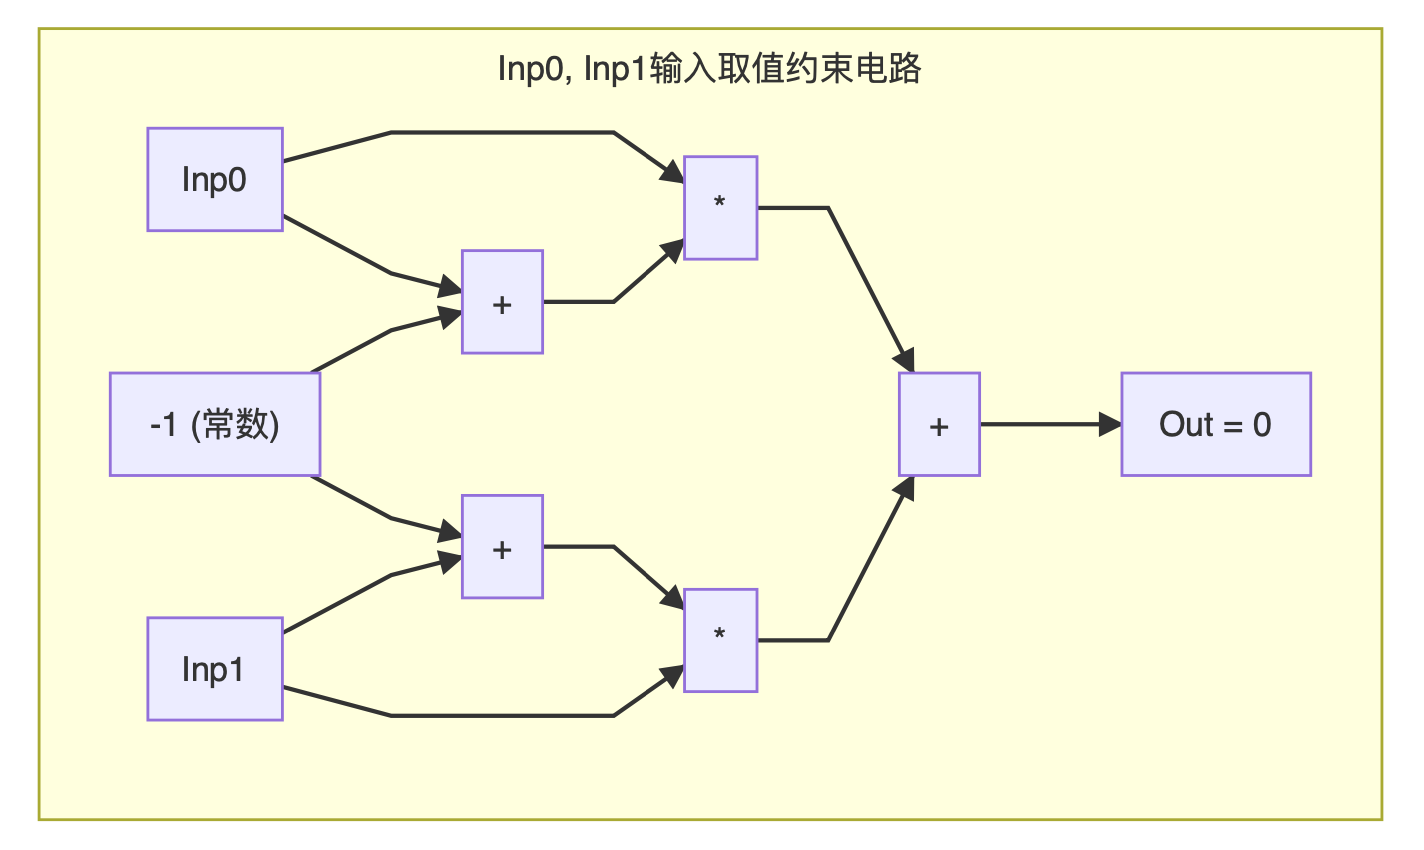
With these two circuits, as long as we determine that the output of the constraint circuit is 0, then the NAND gate circuit will operate normally.
One thing to note is that because our logic gates are built from arithmetic gates, we will find that logic operations are actually very slow : any logic operation must be multiplied at least once, but friends who are familiar with computer hardware will know that multiplication In fact, it is a relatively expensive operation. In this way, it feels a little upside-down in black and white. Logic operations are the cheapest and easiest calculations in computers. However, in mathematical operation circuits, logic operations are a tedious process.
Step 3: Converting to a provable mathematical operation circuit
After we have the concept of a digital arithmetic circuit, we can splice different circuit modules together to generate an arithmetic circuit that can be used as a proof.
First, let's define a digital operation circuit C (x, w) that can be used as a proof . The specific structure is as follows:
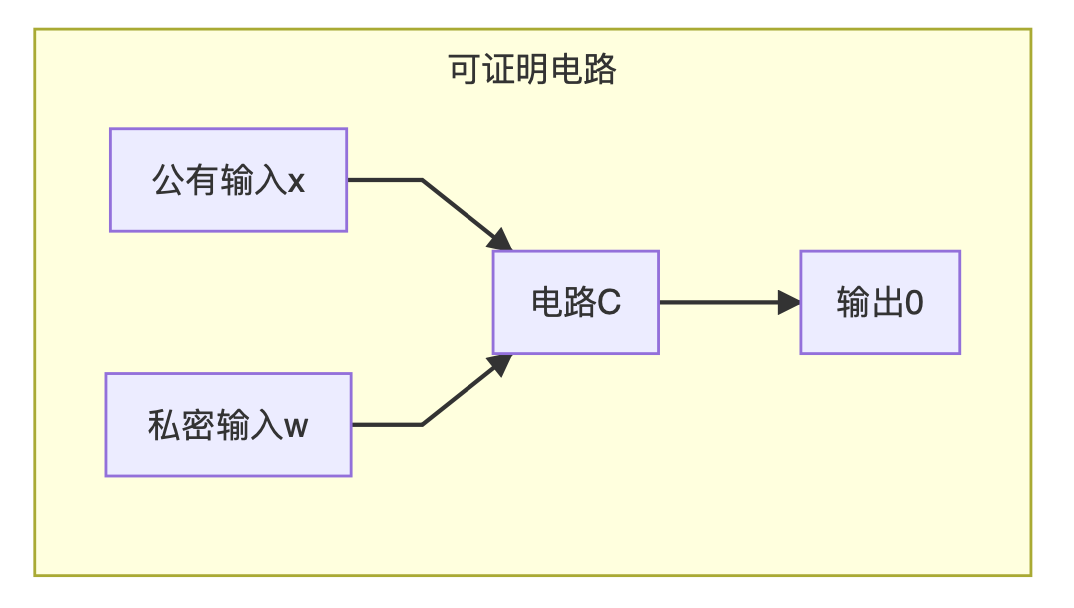
In simple terms, this circuit C has two sets of inputs.
The first set of inputs is labeled x, which we call public input , which means that everyone will know the value of x. This x generally expresses the characteristics of the problem to be proven and some fixed environment variables.
The second set of inputs is labeled w, which we call secret input , or also witness. This set of data is the mystery of the party who actually submitted the certificate. Only the party who proves it will know that other people will not get it.
When we have the circuit C, our goal is to prove that C (x, w) = 0 . In other words, if A and B have known that the mathematical operation circuit C outputs 0 and the public input is x, A needs to prove that she knows the private input value w that can constitute this output.
If we substitute the concept of C (x, w) into the NAND gate example mentioned above, we will find that the NAND gate alone is not enough to be a circuit for proof. We can redefine the problem we want to prove: if we know that the output of a NAND gate is 0 and one of its inputs Inp0 is 1, A wants to prove that she knows the value of the other input Inp1. In this proof process, we must not only ensure that the output of the NAND gate is correct, but also ensure that all input values are taken within the interval we have agreed in advance.
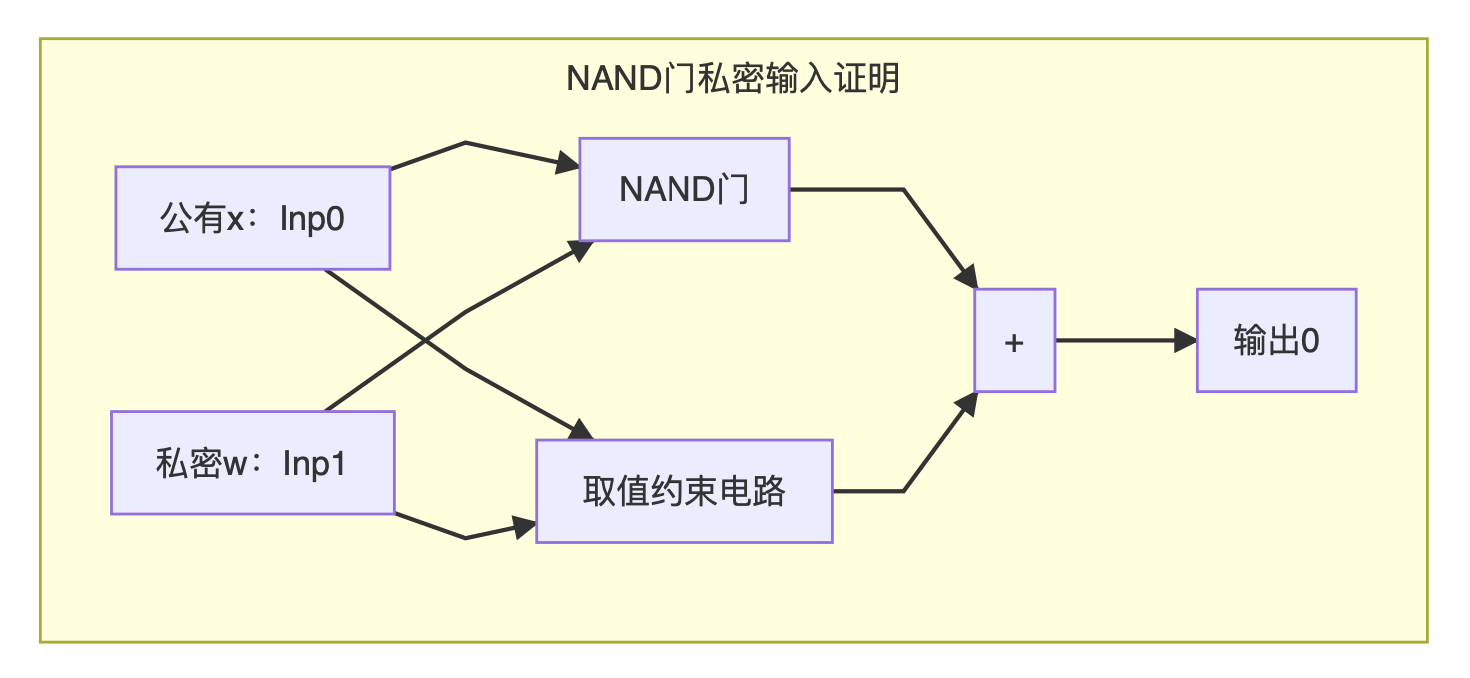
We combine the above-discussed scheme and connect the NAND circuit output and our value constraint circuit together to splice into an operation circuit C, where x is Inp0, w is Inp1, and the output is constrained to 0 to form a complete NAND gate privacy Enter the certification system.
After we get the final proof circuit C, we can calculate the complexity of this arithmetic circuit.
If we want to know how difficult a digital arithmetic circuit C is, we can use how many arithmetic gates there are to describe its complexity. Generally we use | C | to represent. Like the NAND proof circuit mentioned above, | C | is probably around 10.
In a real-life scenario, if we want to represent complex functions like SHA256 with digital arithmetic circuits,
| C | could be as big as 25,000. This is why the proof of actual landing is still very slow.
Step 4: Non-Interactive Short Proof System (SNARK)
After we got the final proof circuit C through the third step, and the corresponding x and w, our preparations are almost done. With the rest, we can hand it to the SNARK algorithm to generate and verify our proof.
First, let's look at the official definition of the entire non-interactive proof system.
An SNARK system often consists of three core algorithms: Setup, Prove, and Verify.
- Generation Algorithm Setup :
 The Setup algorithm takes in the circuit C we have determined to perform a series of preprocessing, and then generates two sets of parameters. The parameters are given to the prover and to the verifier. These parameters are useful for both parties to generate and verify short proofs. In general, the complexity of the generation algorithm and the complexity of the circuit C are proportional, O (| C |).
 - Prove algorithm Prove :
 The proof algorithm does not need to say much, the prover will use Prove algorithm to generate a proof, and then send this proof to the verifier. When the Prove algorithm regenerates the proof, it uses almost all data: preprocessed data, public input x, and private input w. The space complexity of the resulting proof is very short: |
  | = O (log | C |).
 - Verify algorithm :
 The verification algorithm is also very straightforward. The verifier will use the Verify algorithm to verify the certificate we receive.
  . This algorithm will return a value of 1/0, representing whether the verification passed. In addition to the verification process, proof from the other party is required
  We also need to preprocess the data
  , And the public input x. The complexity of verification is also very small. Generally speaking,
With these three algorithms, we can use a simple diagram to describe the entire proof system.

This proof submitted by the prover can fully convince the verifier to convince him that the prover really has such a secret w that C (x, w) = 0.
Example: Range Proof of Input and Output of Private Transaction
Friends who have read the previous article should remember that if we are going to conduct a Confidential Transaction, we need to attach three sets of proofs at the end of the transaction:
- The first group is the Pederson promise , which proves the mathematical relationship between input and output.
- The second group is interval proofs , which need to prove that the values of input and output all take the range of positive integers.
- The third group is the proof of ownership , which proves that the initiator of the transaction really has so many tokens as input.
The implementation of Pederson's promises has been discussed in the previous article. Now that we understand the four-step construction of a short proof, we can look at how to implement interval proofs in detail.
First, we need to find a suitable mathematical operation circuit to describe what we want to prove. (We use a finite field of positive integers by default, and choose a very large prime number p for modulo.)
If we have a number w and we want to prove that this number w is not a negative number, then we can first prove that it will take a value in the range of positive integers. Considering that a positive integer in a computer system generally does not exceed 256 bits, we can weaken the problem a bit: prove that a number w takes a value between 0-2 ^ 256. (According to this condition, the prime number p selected by the finite field needs to be greater than 2 ^ 256.)

Now that we have identified the problem to be solved, we can start thinking about how to express this value relationship using addition and multiplication. Remember in the previous chapter, when we were talking about a value n that would take values between 0 and 1, we used n * (n-1) = 0 to constrain this value range. Similarly, if we want to constrain the value to be between 0 and 5, we can constrain it with a longer series of multiplications :

Seeing this, everyone may already know how to constrain the value of w: we just need to expand this equation in the same way , multiplying from (w-1) to (w-2 ^ 256) continuously, not enough. ?
It sounds simple, but careful friends will find that there will be 2 ^ 256 multiplication gates in the final circuit. With so many multiplications and no additions yet, the complexity of this circuit is already astronomical. Even if you run Setup, you may not know that you have reached the year of the monkey, so we say that this method of constraint is not practical .
So what other way to constrain the space of this number w? We can cleverly use the structure of binary numbers . Now that we want to specify that w is an integer and is greater than 0 but less than 2 ^ 256, we can split w into 256 bits in binary and constrain each bit individually . In this case, the size of the circuit we end up with will only be proportional to how many digits this number has, and not related to the maximum upper limit of this number. Suddenly the complexity went down a level.
How does it work? We first split w into 256 bits:

Because each bit is binary, we need to constrain the value space of each bit to 0 and 1:

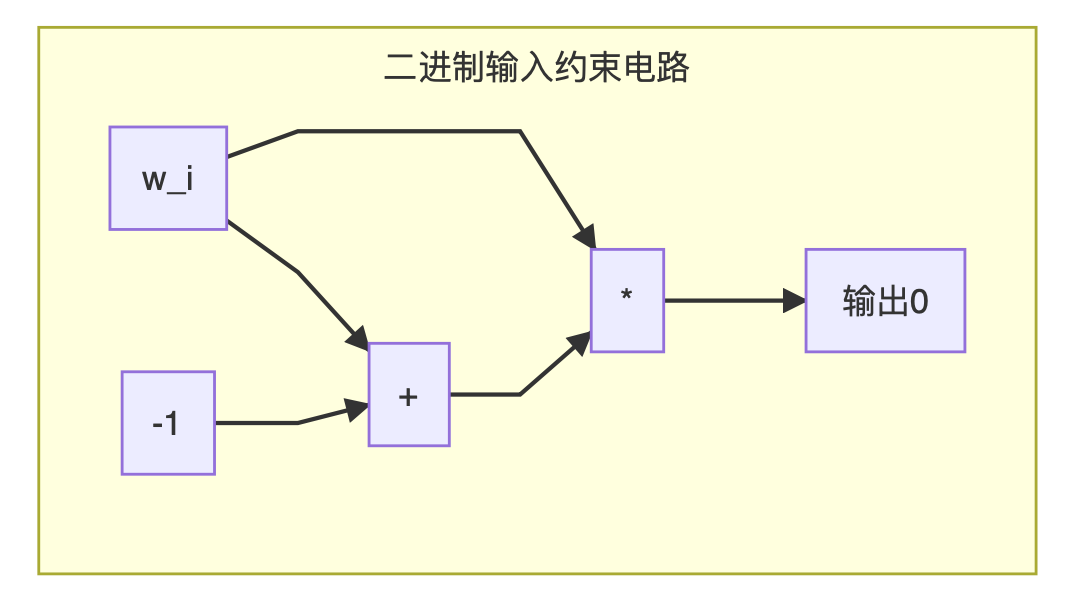
This constraint requires 256 copies, one for each bit. After we prepared these constraints, we finally determined that all the bit groups can be restored to the original w:

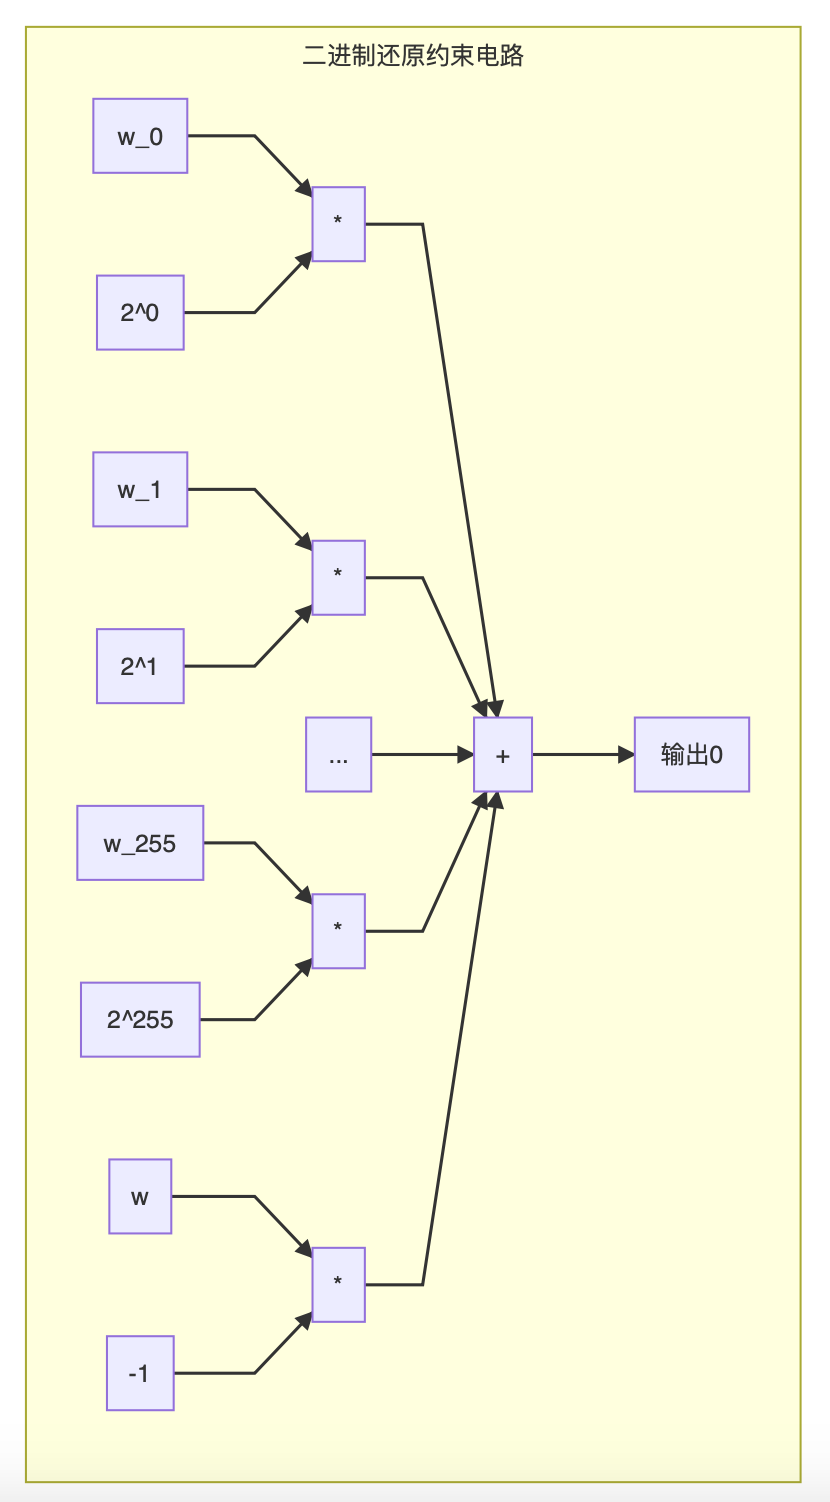
We stitched all the 256 + 1 = 257 sets of constraint circuits mentioned above together and combined them into one output. The resulting circuit is the circuit C that we can use to build the proof system. If the output of C is 0, then the number representing the input must meet:
- This number is a positive integer and can be expressed as a 256-bit binary number.
- These 256-bit binary numbers are indeed binary numbers. (Can only take the value 0 or 1)
- The 256-bit binary numbers are all put together to restore the numbers entered.
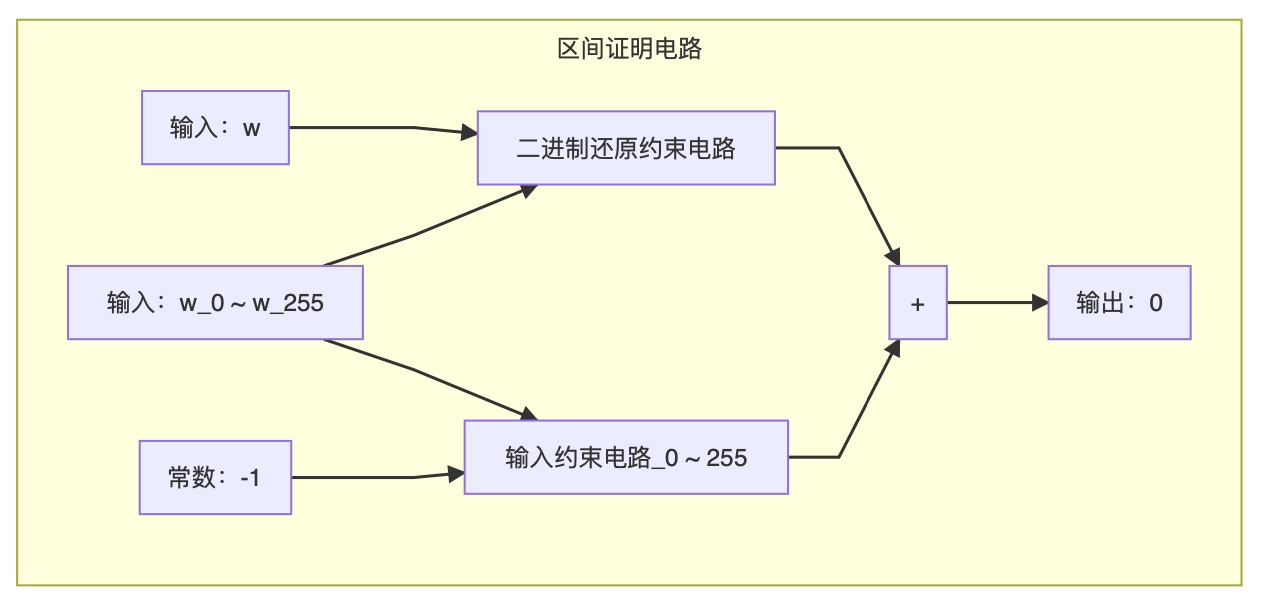
By cleverly using the characteristics of binary, we have a set of moderately sized mathematical operation circuits, and we can call Setup to prepare to generate subsequent SNARKs.
Example: Ownership of Private Transaction Input
After solving the interval proof, let's complete the last set of proofs for the private transaction: proof of ownership , which proves that the input value of the private transaction is reasonable.
Friends who have read the previous article should know that we talked about two systems of ownership certification for private transactions:
The first solution is that a transaction can directly reference the output of the previous transaction, but this will bring the chicken and egg problem: the difficulty is how to create the first private transaction. The second solution is to add another new certificate under each transaction to prove that the account balance of the user who initiated the transaction really has so much money.
I want to focus on the second proof scheme, which is to prove the balance of the account of the transaction initiator in the state of the world.
In many blockchain scenarios, the state of the entire world is a huge ledger. Each line of the ledger records the account balance of a certain user.
In order to more easily represent the state of the entire world, we often use the Merkle tree to turn the huge world ledger into a series of short and smart Merkle hashes. This Merkle hash will change whenever any balance on any account changes.
The Merkle tree is actually a binary tree. Each node will stitch the values of the following two child nodes together and calculate the corresponding hash value as its own value. In order to facilitate the construction of the Merkle tree, we will first perform a hash calculation on the original balance values, and then store their hash values at the lowest level of the Merkle tree.
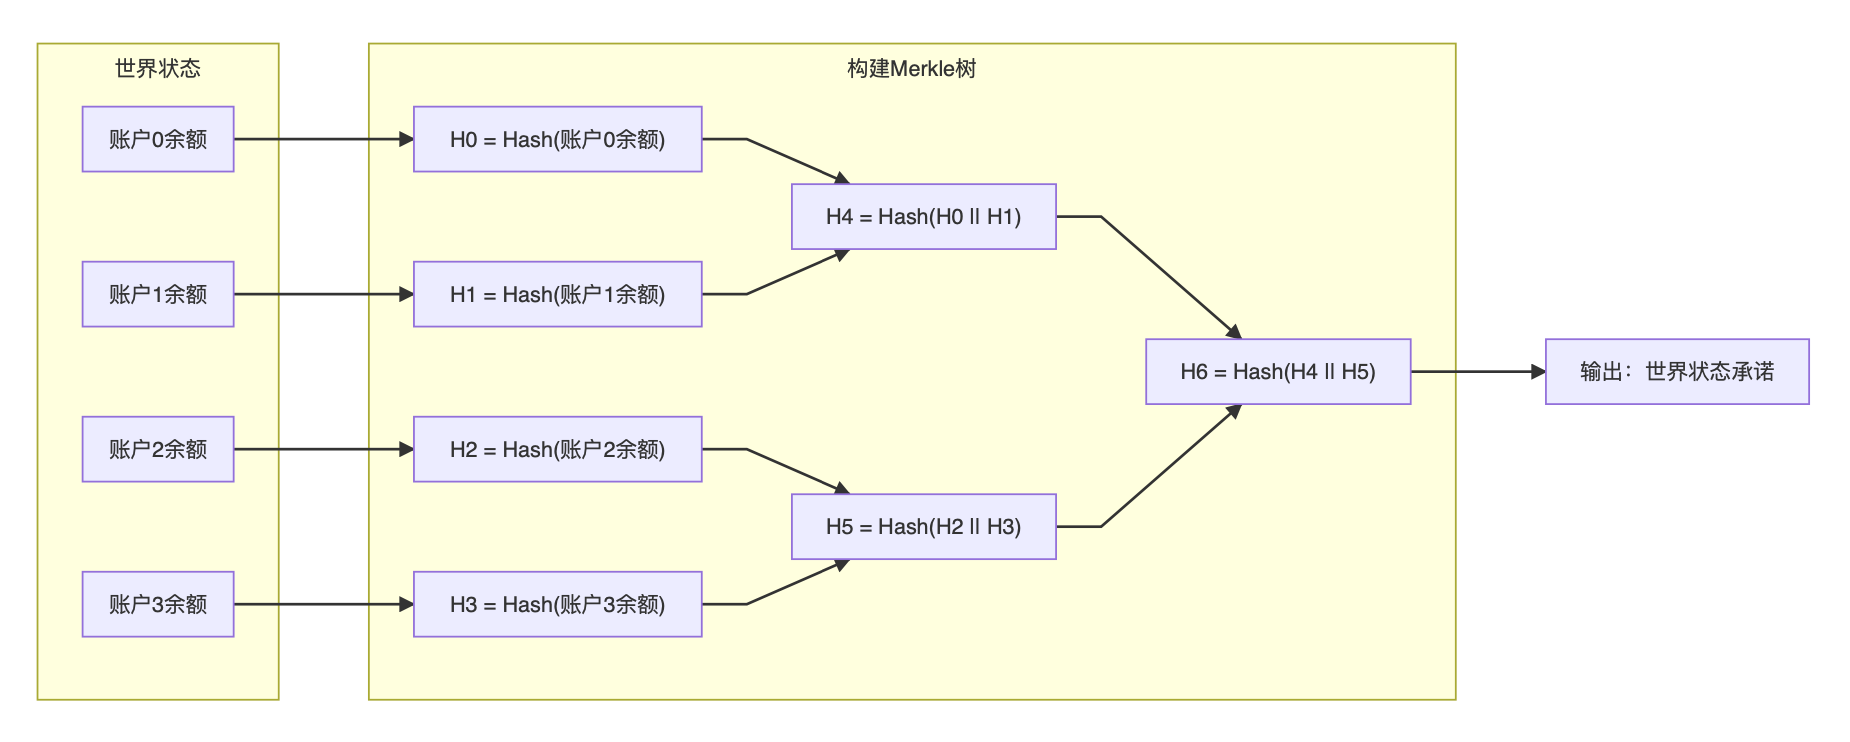
When we construct a Merkle tree in this way, we can treat the output Merkle hash as a promise : As long as the promise does not change, then the current state of the world will definitely not change . In the blockchain, if we want to record the state of a long series of data, generally in order to save space, Merkle promises will record all data on the chain, rather than storing the data itself on the chain.
After we have a commitment to the state of the world, the follow-up question is: if A is account 1 in the picture above, there is now 5 yuan. How does A prove to B that in the whole state of the world, her balance is really 5 yuan?
A very simple method is: A can submit the balance of all accounts to B, and then B performs the calculation promised by Merkle again. As long as B's calculated commitment is equal to the current world state commitment, and A's own account balance is indeed 5 dollars, B can believe that A really has 5 dollars.
It sounds like a good method, but the problems with this method are clear at a glance. There are hundreds of millions of users joining this world. If A needs to submit a balance of hundreds of millions of lines to B, let alone how B effectively calculates this commitment, network traffic will be used up. And this proof method will expose the balance information of all users , and everyone is definitely not willing.
So how to effectively prove that the balance of account 1 belongs to the current state of the world? At this time we can use the characteristics of Merkle trees to construct Merkle proofs .
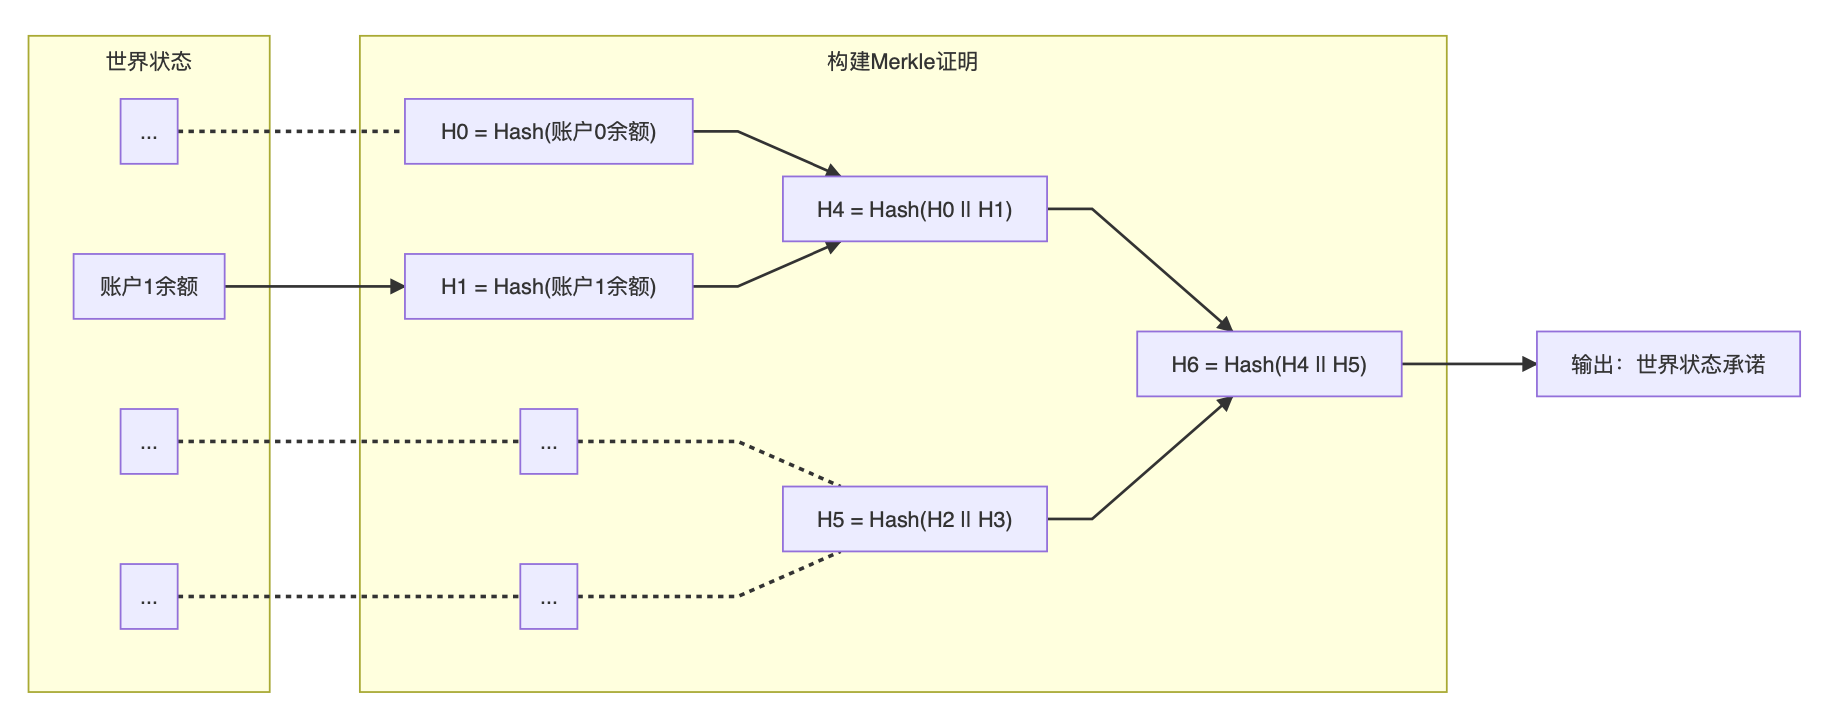
If you look closely at the Merkle tree after some pruning in the figure above, we will find that as long as it proves that the balance of account 1 can form the final world state commitment with adjacent nodes in the Merkle tree, we can also prove the balance of account 1 Belongs to the current state of the world.
So how do you do that? Let's start with the balance of account 1 and go all the way up the Merkle tree.
With the balance of account 1, then we can calculate H1. After H1, we found that we don't need to know the balance of account 0, as long as one H0 value, we can combine to generate H4. In the same way, we can combine the value of H5 to finally generate the Merkle promise of the vertex-H6. In the end we only need to submit three things to complete this Merkle proof: the balance of account 1, H0, H5. All the remaining hash values can be calculated during the verification process. This is Merkle proof .
Through Merkle proof, we can greatly reduce the size of the proof, and we can also try to ensure that the balance of other users in the world state is not exposed during the proof process. Merkle's proof is very useful in cryptography, with just the size needed to prove that something is in a list of length N. Often we use Merkle proofs to prove that a set of data belongs to a large file, a user belongs to a large organization, and so on.
After understanding the principle of Merkle proof, let's see how to prove that A can prove her balance in a private transaction.
The essence of Merkle proof is that we can start with the value to be proved, calculate the hash value all the way up, and continuously merge with the hash value of adjacent nodes . But we found a very fatal problem: Although we can hide the balance of others in the state of the world, we still have to expose our balance (otherwise there is no way to calculate the first hash value H1). This is contrary to the nature of our private transactions!
At this time, the power of SNARK is needed. We can split this problem into two steps.
Step 1: Prove balance hash value
In the first step, we use SNARK to prove that the balance of account 1 can get the hash value H1 after passing the hash function.
Because we want to hide the balance of account 1, we use w to represent this number. Before applying SNARK, we also need to change the description method of the problem to make it more convenient to express with mathematical operation circuits:
Suppose A owns a secret w = balance of account 1. Both A and B know in advance the hash value H1 of the balance of account 1 (we can use x to represent it). We can construct a mathematical operation circuit C: Hash (w)-x = 0 . If C (x, w) = 0, then Hash (w) = x.
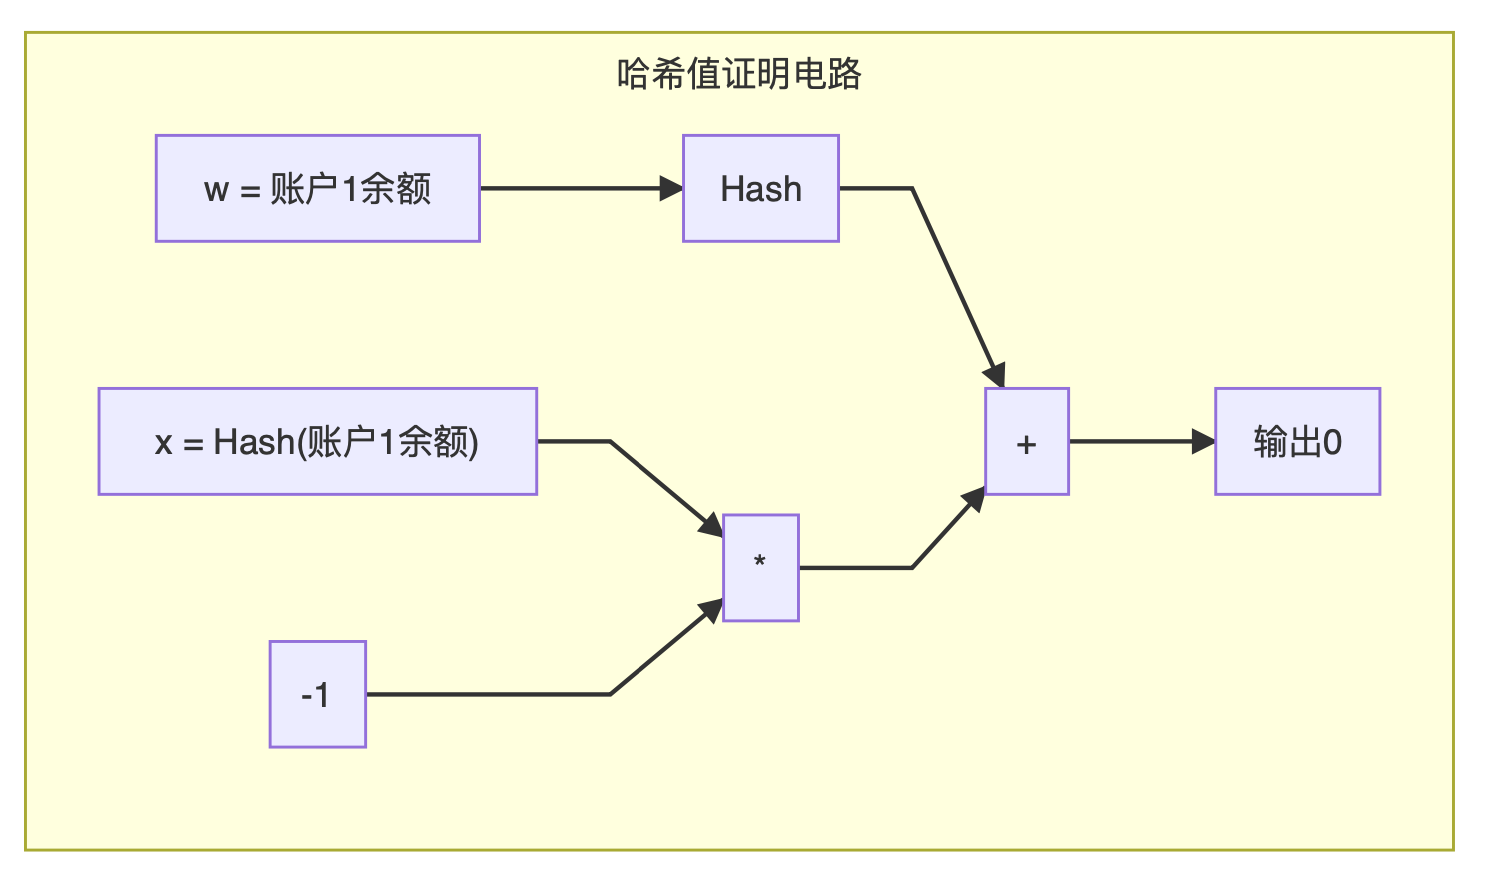
In order to simplify the expression, we use an abstract module to represent the hash function on the graph. In practice, we generally use the SHA256 hash function. After we get the final circuit C, we use the Setup algorithm to generate the parameters, and then use the Prove algorithm to generate a short proof.
Through this step, we will get a public x and a proof, and the value of this x is the hash value of the balance of account 1 . Although we can't see the real balance of account 1, because of the strong SNARK proof, we have to believe x = Hash (w).
Step 2: Complete Merkle proof from H1
The previous step gave us H1, and also provided proof that H1 was really generated from the original state of the world. What we have to do now is to start from H1 and combine with neighboring H0 and H5 respectively to generate a new world state promise. If we compare this generated promise with the old promise saved on the blockchain, then we can believe that the balance of account 1 is really in this state of the world.
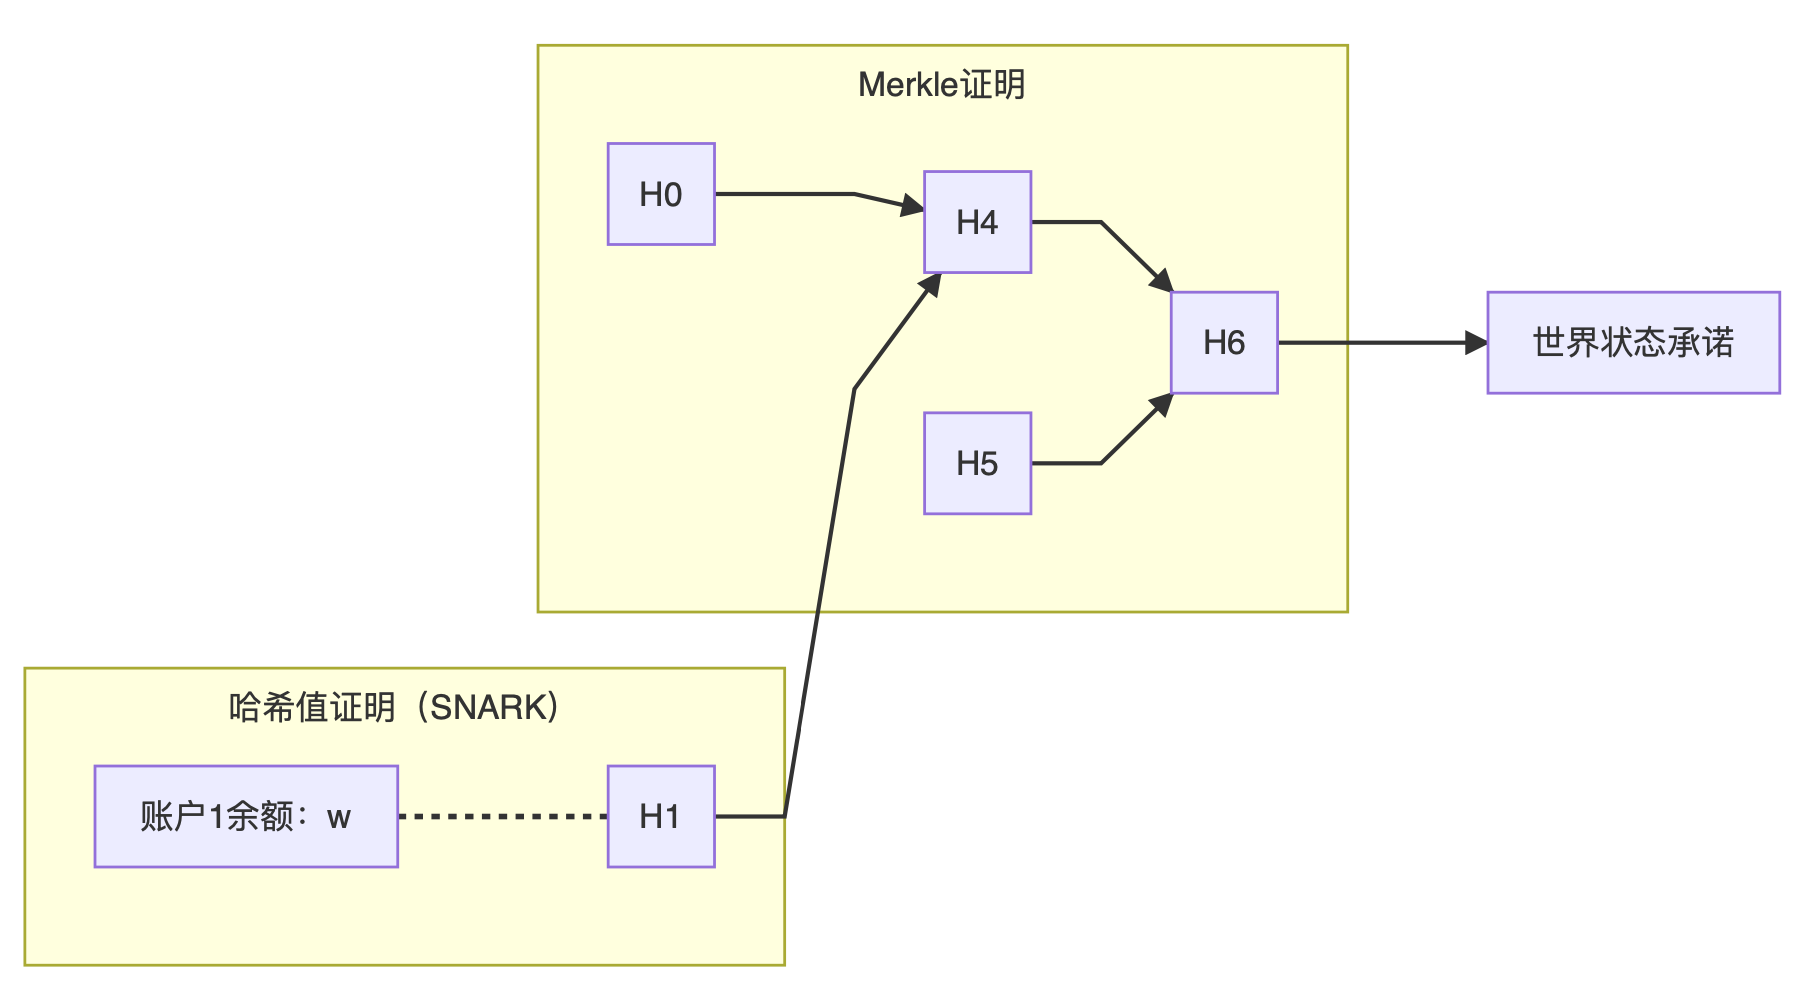
In summary, we divide the proof of ownership into two steps. The first step proves that the secret w can be converted to x by the hash function, and then proves that the public x belongs to the Merkle tree of the entire world state. Submitting proof of A knowledge proves that she knows a secret account 1 and that this account is in the current state of the world. The verification certificate B or other people still have no way of knowing which account A knows, but have to believe that it is true.
Summary of Private Transaction
Seeing this, everyone must have a general understanding of how private transactions are realized. Now let me summarize what she would do if A were to pay B a private transaction.
- First, A needs to submit a private transaction to the entire network. This transaction contains the initiator and payee of the transaction, but it does not have any number. The original number of inputs and outputs was replaced by a series of garbled characters.
- Beneath this transaction, A needs to attach a Pederson commitment to prove that the numbers of the inputs and outputs add up to be equal.
- Then A needs to attach a Range Proof generated by SNARK , which proves that the input and output numbers are positive integers greater than 0.
- Finally, A needs to attach a proof of ownership to prove that she really owns an account w with money deposited in it. This ownership certificate is divided into two parts, one is a hash value certificate generated by SNARK , and the other is a Merkle certificate , which proves that the previous hash value really belongs to this world state.
Through these four steps, A can pack all the things to be generated, and then send them online. Miners saw this package and used Verify to verify all the proofs. If all is right, the transaction is complete. Is not it simple?
To be continued
Due to space reasons, I'll stop here this time. You must have seen here. You already know something about the "proof" part of zero-knowledge proofs. You probably know what a mathematical operation circuit is, and then how can we turn real-life problems into circuits.
I believe many people will be curious, then how does the three algorithms Setup, Prove and Verify work? In the next issue, we will continue to dive deeper to understand the principles behind the SNARK proof system.
We will continue to update Blocking; if you have any questions or suggestions, please contact us!
Was this article helpful?
93 out of 132 found this helpful
Related articles
- Denial of service (DoS) attack: Chengye miner, defeated miner
- Blockchain Concepts 2019: restlessness and embarrassment
- The man behind Cosmos's $ 1 billion valuation: Jae Kwon
- There are pictures and the truth! Events of China's public chain Yuanjie DNA2019
- South Korea's Ministry of Finance: Current tax law does not impose income tax on cryptocurrency transactions
- List of 18 golden sentences Ling listening to the 2020 New Year's Essence
- After listening to this New Year's Eve speech, I was in tears: this is the 'good voice' entering 2020


