Wisps: The Wonderful World of Create2

– WISP – Herrmann Hendrich (1884) –
During the ETHCapeTown hackathon , we used a powerful, new Ethereum opcode , CREATE2 , to create a quick proof of concept for a contract wallet.
Compared to the CREATE opcode, the CTEATE2 opcode can better control the address of the new contract when using the Ethereum contract to generate a new contract, when you want to counter-factually deploy and use a custom-privileged contract. This is very useful when.
- Starting from the account paradigm and the Token paradigm, why is Facebook Libra not a non-nationalization of currency? Platon Zou Chuanwei
- Bitcoin breaks into a new high in the year, and billions of funds are on the market.
- How to technically enhance the privacy of Ethereum?
The goal of the Wisp contract is to demonstrate a technique for generating a stable contract wallet address that can be shared with other users, as well as token and Ether transfer functions, while still retaining any chain contract wallet code. Control chain assets (such as ENS domain names).
The advantages of Wisp addresses include: First, all transactions sent to this Wisp address require only a certain 21,000 gas, but more importantly, this means a contract wallet that can access tokens, funds, and other chain assets. Can't be attacked because its code is actually not on the chain.
If there is an error in the contract wallet, it can be updated on the client before being used again, during which all encrypted assets are secure.
Spoiler and too long to read version: Use the static bootloader initcode to get the CREATE2 runtime contract bytecode to generate a reusable contract address.
What is initcode?
Before diving into this technology, you must first understand the deployment process of the Ethereum contract.
The contract deployment process uses a piece of code called initcode, which is just a normal Ethereum program, and normal execution returns the contract bytecode actually used by the deployment contract. Although somewhat abstract, it can support a very powerful deployment system.
As you can imagine, the initcode of "Hello Word" in JavaScript might look like this:
  Function initcode() {
     Return "console.log(\"Hello World\")";
 }
This program will return a "Hello World" program when it runs. Doing so allows for additional deployment time configuration, such as:
  Function init(language) {
     If (language == "en_pl") {
         Return "console.log(\"Ellohay orldway\")";
     }
     Return "console.log(\"Hello World\")";
 }
A very important point to note is that instead of initcode being deployed, the result of running initcode.
CREATE vs CREATE2
Although most Ethereum developers use CREATE opcodes (to deploy chain contracts), they may not be aware of it. The bytecode generated by Solidity is actually initcode, which uses CREATE to perform the corresponding operations in the constructor, and then returns the contract in addition to the constructor. The code that actually deploys the chain does not contain the constructor code.
To determine the contracted address of the deployed chain, the standard parameters used by CREATE include:
- Send an account (it may also be a contract itself)
- The current transaction serial number of the sending account (may also be the current nonce of a contract)
Therefore, any two different senders will generate different contract addresses, and any two different transactions from the same account will also generate different contract addresses.
To determine the contracted address for the deployment, the new CREATE2 uses:
- Send an account (again, it may also be a contract itself)
- Contract initcode (execution yield contract bytecode)
- Custom number set by the developer (salt)
Therefore, CREATE2 is the same as CREATE, and different senders will generate different contract addresses. The initcode is the same\but different custom addresses will be generated when the custom number is different. When the initcode is not the same (usually means different contracts), different contract addresses will be generated.
Another noteworthy (useful) of CREATE2 is that because it has a bit more control over the parameters of the calculated contract address, if a contract is self-destructing, the new contract can be deployed to this address again in the future . However, if a non-self-destructing contract has been deployed to this address, CREATE2 cannot deploy a contract again at this address.
Comprehensive
Since controlling senders and custom numbers is easy, the only thing to do to achieve Wisp contract goals is to bypass the second parameter of CREATE2; eventually allowing two different contracts to be deployed at the same address at different times .
However, initcode is just a program for determining the contract being deployed. This feature can be exploited in a variety of interesting ways.
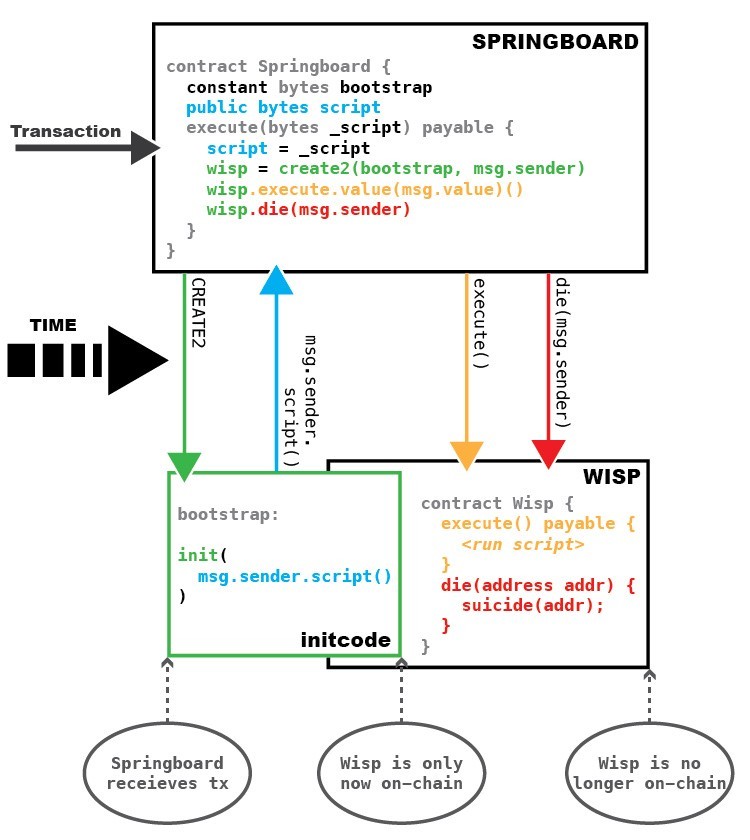
The entry for each Wisp contract is a Springboard Contract that enables and manages all CREATE2 calls, so the springboard contract will always be the sender. As for salt, because the hash of msg.sender is used as a custom number, any two calls to the same account will always point to the same Wisp contract.
The rest is a normal (static) bootloader initcode. Initcode is going to run in the new contract, but the new contract has not yet been created; this means that msg.sender is actually a springboard contract. Therefore, the springboard contract saves the required contract bytecode in its own storage space and provides a public method called getPendingBytecode(). The bootstrap's (pseudo) code can be simply represented as follows:
  Function init() {
     contractBytecode = msg.sender.getPendingBytecode()
     Return(contractBytecode);
 }
Since the bootstrap initcode is always the same, as long as the contract is an enforced self-destructing contract (but not within the scope of this article), the springboard contract can control CREATE2 to generate a fully consistent contract address.
In other words, in general, we removed some minor details for the source code, and added some extra content. In short, the technology works well and interested developers are ready to use!
Wisp contract life cycle
This is a simple chart and summary to help illustrate the life cycle of the WIsp contract:
- The destination address of a transaction is a springboard contract (note that the contract can also call a springboard contract, in which case the contract address will have a Wisp contract)
- CREATE2 is used to initialize the Wisp contract
- During initialization, the Wisp contract calls back to the springboard contract to get the required runtime bytecode, which is then returned by initcode.
- Run all required operations when the Wisp contract's execute() method is called
- When the Wisp contract's die() method is called, the Wisp contract is destroyed, so the contract can be recreated at that address in the future.
Note: All ETHs will be returned to the Wisp contract owner because ETH is not safe in a contract that is planned to self-destruct.
Springboard contract code (Solidity)
A simple example: This is the code that was deployed to Ropsten and used during the hackathon . Like most hackathon code, it's a bit rudimentary, so don't use it for real-world applications.
This version supports both external external accounts (EOA) and ENS domain names. If the ENS domain name version is called, the ENS domain owner controls the Wisp contract, which allows the Wisp owner (and all assets it controls) to be transferred by modifying the address resolved by ENS.
  Pragma solidity ^0.5.5;
 Interface ENS {
   Function resolver(bytes32) external view returns (address);
 }
 Interface Resolver {
   Function addr(bytes32) external view returns (address);
 }
 Interface Wisp {
   Function execute() external;
   Function die(address owner) external;
 }
 Contract springboard {
   ENS _ens;
   Bool _mutex;
   Bytes _bootstrap;
   Bytes _pendingRuntimeCode;
   Constructor(address ens, bytes memory bootstrap) public {
     _ens = ENS(ens);
     _bootstrap = bootstrap;
   }
   Function getBootstrap() public view returns (bytes memory) {
     Return bootstrap;
   }
   Function _execute(bytes runtimeCode, bytes32 salt) internal {
     // Prevent re-entry
     / / Prevent re-entry require (!_mutex);
     _mutex = true;
     // Store the desired runtime bytecode
     / / Store the required runtime bytecode _pendingRuntimeCode = runtimeCode;
     Bytes memory bootstrap = _bootstrap;
     Address wisp;
     Uint256 status;
     // Create the Wisp
     / / Create Wisp
     Assembly {
       Wisp := create2(callvalue, add(bootstrap, 0x20),
                       Mload(bootstrap), salt)
     }
     // Run the Wisp runtime bytecode
     / / Run Wisp runtime bytecode Wisp (wisp).execute ();
     // Remove the Wisp, so it can be re-created in the
     // future, with different runtime bytecode
     // Remove Wisp, so in the future you can recreate the contract Wisp(wisp).die(msg.sender) with a different runtime bytecode;
     _mutex = false;
   }
   // Calling this will create the Wisp on-chain, execute the
   // runtime code and then remove the Wisp from the blockchain.
   / / Call this function will create Wisp on the chain, execute the runtime code, and then remove Wisp on the chain
   Function execute(bytes memory runtimeCode) public payable {
     _execute(runtimeCode, keccak256(abi.encodePacked(msg.sender)));
   }
   // This method is the same as execute, except it uses ENS names
   // to manage a Wisp. This allows a simple form of ownership
   // management. To change the owner of a Wisp, simply update the
   // address that the ENS name resolves to, and all the Wisp's
   //assets will be able to be managed by that new address instead.
   //This method is the same as execute, except that it uses the ENS domain name to manage Wisp.  This method allows for simple // ownership management.  In order to change the ownership of Wisp, you only need to simply update the address of the ENS domain name resolution.
   //All assets that can implement Wisp contracts are managed by the new address
Function executeNamed(bytes32 nodehash,
Bytes memory runtimeCode) public payable {
// Verify the ENS nodehash is owned by msg.sender
/ / Verify ENS nodehash (node hash) by msg.sender all Resolver resolver = Resolver (_ens.resolver (nodehash));
Address owner = resolver.addr(nodehash);
Require(owner == msg.sender);
// Execute based on the nodehash
/ / Based on nodehash (node hash) execution _execute (runtimeCode, nodehash);
}
// This function is called by the Wisp during its initcode
// from the bootstrap, fetching the desired bytecode
//Wisp calls this function from the bootstrap during initcode to get the required bytecode function getPendingRuntimeCode() public view returns
(bytes memory runtimeCode) {
Return _pendingRuntimeCode;
}
} The bootstrap used during the hackathon is very simple and is handwritten code, so it can be easily assembled using a few lines of JavaScript code in the deployment script. However, because the code is not robust enough, you need to check the return status.
  ; mstore(0x00, 0x94198df1) (sighash("getPendingRuntimeCode()"))
 0x63 0x94198df1
 0x60 0x00
 0x52
 ; push 0x03ff (resultLength)
 0x61 0x03ff
 ; push 0x20 (resultOffset)
 0x60 0x20
 ; push 0x04 (argsLength; 4 bytes for the sighash)
 0x60 0x04
 ; push 0x1c (argsOffset; where the 4 byte sighash begins)
 0x60 0x1c
 ; caller (address)
 0x33
 Gas
 0x5a
 ; staticcall(gas, caller, args, argsLen, result, resultLen)
 0xfa
 ; mload(0x40) (bytecode bytes length)
 0x60 0x40
 0x51
 ; push 0x60 (0x20 + 0x20 + 0x20) (bytecode bytes offset);
 0x60 0x60
 ; return (bytecodeOffset, bytecodeLength)
 0xf3
 ;; // Assemble in JavaScript:
 ;; // Assembled in JavaScript:
 ;; function assemble(ASM) {
 ;; let opcodes = [];
 ;; ASM.split("\n").filter((l) =>
 ;; (l.substring(0, 1) !== ";" && l.trim() !== "")
 ;; ).forEach((line) => {
 ;; line.split(" ").forEach((opcode) => {
 ;; opcodes.push(opcode);
 ;; });
 ;; });
 ;; return ethers.utils.hexlify(ethers.utils.concat(opcodes));
 ;; }
WIsp example
There are several examples of Wisp contracts in GitHub repo, but basically all operations can be placed in the execute() function.
For the purpose of a hackathon, any balance forwarded to Wisp is provided as a donation in the CREATE2 section, so use this.balance instead of msg.value. As shown in the illustration above, it can be forwarded to the execute() function. Here are some examples of the work that can be done in a Wisp contract:
  Interface WETH {
   Function deposit() external payable;
   Function transfer(address, uint) external returns (bool);
   Function balanceOf(address) external returns (uint);
   Function withdraw(uint) external;
 }
 Contract Wisp {
   Function execute() {
     // Call WETH to convert between ether and WETH
     // Call WETH to convert ether and WETH
     WETH weth = WETH (0xe7a70dD69D8D2e2f0e775FfAC0C440f23D2ABb72);
     WETH(wethContract).deposit(0.1 ether);
     Weth.withdraw(weth.balanceOf(address(this)) / 2);
     // Transfer ether
     / / Transfer Ethernet (0x30bc5920A76B483080523482D7FC2B64c9D5bd80).transfer (1 ether);
   }
   Function die(address addr) {
     Selfdestruct(addr);
   }
 }
in conclusion
The CREATE2 opcode is great and versatile. We are still doing research and we are trying to use it to create an asset store in our multi-signature contract wallet.
Our goal is to create a reliable and flexible asset store that can store a large number of CryptoKitties, ENS domain names and various tokens, while easily transferring assets between multiple signature instances. Because a Wisp contract can perform arbitrary operations on the assets it controls, it can even use features that did not exist when the asset was accessed.
It can be said that it is basically a fancy delegate call (Delegate Call).
Thanks for reading! Thank you for your feedback or suggestions for our work. If you want to follow up on my talk and projects, follow me on Twitter and GitHub .
Please note : Most readers do not need to use this version. If you are interested in the more advanced version we are researching, please see below!
(The next generation of springboard contract codes are provided below, omitted here)
Original link: https://blog.ricmoo.com/wisps-the-magical-world-of-create2-5c2177027604 Author: RicMoo translation & proofreading: Aisling & A sword
This article uses the CC-BY-4 Freelance License Release, and anyone can use this article freely, subject to the author's signature.
We will continue to update Blocking; if you have any questions or suggestions, please contact us!
Was this article helpful?
93 out of 132 found this helpful
Related articles
- Babbitt column | Libra currency system is a 100% reserve full reserve banking system
- The power plant harvested miners army: the bull market rose freely, the miners were forced to sell the mine
- Why is this bull market different?
- Conversation | Libra needs to deal with three issues toward an unlicensed network
- The Fed’s monetary policy or assists with God, BTC’s next stop of $100,000?
- Silicon Valley vs Wall Street: Libra is just the beginning of a long bloody battle
- Inventory: 58 terms that have to be known to chat with the chain people